Monday, December 29, 2014

Checkerboard Sugar Cookies

This year after a long break the ladies in my neighborhood decided to have a cookie exchange. Everyone was to bring 3 dozen cookies. I wanted to bake a cookie that looked special but I did not want to use frosting. My first thought was swirl sugar cookies rolled in sprinkles. Though the cookies look festive I was not sure I wanted to use food color. My next thought was chocolate dipped squares. But I rarely bake cookies and do not have a square cookie cutter. I had no time to go out to buy one so that was out. Then I thought of making these checkerboard sugar cookies and that worked just right. The checkerboard pattern made with cocoa powder and plain cookie dough was festive enough to not need any frosting or food coloring.


I had made swirl cookies for the fourth of July. I used the same basic recipe for these cookies. I divided the dough into two portions by weight and added a tablespoon of cocoa powder to one half to color it. I left the dough overnight in the refrigerator and baked the cookies early the next morning. The cookies were well appreciated and I had a great time at the cookie exchange.


I had cut out instructions from a magazine for the checkerboard pattern. It is very easy to put together. Do not be intimidated by it.

You will need (for about 36 cookies)
3 cups flour
1/2 tsp. baking powder
1/2 tsp. salt
1 cup unsalted butter, softened
1 1/2 cup sugar
2 large eggs
2 tsp. vanilla extract
1 tbsp. cocoa powder

In a bowl sift the flour, baking powder and salt. Keep aside. In another bowl beat the butter. Add the sugar and beat again to mix well. Add the eggs one at a time and beat until well mixed. Add the vanilla extract and beat until frothy. Fold in the flour mixture and form a dough. Weigh the dough and divide into two. Flatten one half and sprinkle the cocoa powder. Fold in and mix until well distributed. Do not overwork it. Wrap both portions separately in plastic wrap and refrigerate for 20 minutes.

Roll out the dough separately into two rectangles. Slice along the length to form three long rectangles as in the picture below.


Switch the center portion of the plain rectangle with the color one. Sandwich the pieces together. You should have one rectangular block plain-colored-plain and the other colored-plain-colored. Place the plain-colored-plain block such that the plain side is facing up. Slice into three long rectangle. Repeat with the colored-plain-colored block, only this time with the colored side facing up. You will get a pattern as in the picture below.


Now switch the middle portion of one set of three rectangles with the middle portion of the other set. Stack them up and you will have a checkerboard pattern.


Wrap it in plastic wrap (you can reuse the wrap you used earlier) and refrigerate overnight.

When you are ready to bake, preheat oven to 350 F. Prepare two baking sheets with parchment paper lining. Transfer one rectangular roll from the refrigerator to your work surface. Slice every 1/4 inch with a sharp serrated knife. You can adjust the width as per your preference.


Transfer the sliced cookies to the baking sheet.


Bake for 10-12 minutes until the bottom is lightly colored. Repeat with the remaining dough. I baked three batches with 12 cookies in each. Let the cookies cool completely on a cooling rack before storing them in an air tight container.


Enjoy!

Friday, December 26, 2014

Breakfast Potatoes

Potatoes are served as part of a good, filling well balanced breakfast all over the world whether it is in the form of hash browns, roasted potatoes or potato paratha. I have wanted to make roasted potatoes for a while now. My daughter loves potatoes in any form or shape and I knew she would love this version. She is on winter break so I wanted her to have an elaborate breakfast, something that does not happen often in the rush to make it to school on time. She wolfed everything down very quickly which was a pleasure to watch.


You can add additional spices if you like the potatoes spicy. We liked them with salt, black pepper and a little cayenne pepper.

You will need
1 large Russet potato
1/4 large red onion
1/4 red bell pepper
1 tbsp olive oil
1 tsp. cayenne pepper
salt and pepper to taste

Preheat oven to 425 F. Wash, peel and chop the potatoes into one inch chunks. Chop the onions and the red bell pepper. In a mixing bowl mix the the vegetables with the remaining ingredients.


Transfer to a baking sheet and bake for 20-30 minutes turning over once or twice.


The potatoes should brown but not burn.
 

Enjoy them hot with other breakfast staples!


Thursday, December 25, 2014

Hot Chocolate

Hot chocolate and winter go hand in hand. If you like chocolate chances are you will like hot chocolate too. I say 'chances are' because I know a few people who love chocolate but are not fans of the beverage. I like chocolate, period. So I enjoy my cup of hot chocolate on a cold winter day.


It was dreary, cold and rainy the day I made the hot chocolate. My normally bright kitchen looked dark and gloomy even at 10 in the morning. It was the kind of day you want to spend snuggled in a blanket with a good book, a cup of hot chocolate and a warm cat curled on the lap. The cat on the lap is wistful thinking on my part. Mine does not spend more than 3 minutes on my lap, even a warm blanket on a cold day does not entice her. She would rather sleep curled up on the rug in the weak beam of sunlight streaming through the window. But I have only myself to blame. At the shelter I picked the almost unadoptable spitfire over the cuties hovering at my feet. As such the three minutes of love she showers on me is a blessing.


Well, even if I cannot get the cat to cooperate I can snuggle with a book and the hot chocolate. Though I make several different types of hot chocolate my favorite recipe comes from the King Arthur website.

You will need (for 1 cup)
1 cup milk
1/2 tbsp. dry milk powder
1/2 tbsp. sugar
1/2 tbsp. 100% cocoa powder

Bring the milk to a boil in pan. Lower heat allow to simmer. Meanwhile combine the dry ingredients in a separate pan.


Add them to the simmering milk and whisk to dissolve. Turn off heat and pour out the hot chocolate.


Enjoy!


Wednesday, December 24, 2014

Ginger Snaps

When the mercury dips we love spicy cookies. These ginger, cinnamon and cloves flavored cookies are perfect for winter. They also happen to be my childhood favorites. The mercury never really dipped too low where I grew up but I loved the taste of ginger in the cookies. I am not really a tea or coffee person but I think they would be great with a cup of tea. If you have never tried them before but like the taste of ginger spice you will love them.


These are not soft cookies. They have a snap to them. At the same time they are not hard either. They are thin cookies that crumble once you take a bite. Heating the butter is the trick to getting the texture just right. Heating helps take out the moisture from the butter just enough to keep them going soft.


I baked these to make a base for a pumpkin tart. I thought the ginger and pumpkin flavors would be great. My daughter had other plans. She insisted on taking them to school as a snack. And I have been asked to please not use the rest. I am glad she likes them just as much as I do.

A long time ago when I browsed magazines for recipes and noted them down in recipe cards, I had this recipe jotted down.

You will need (makes about 12 thin cookies)
25 gm butter
25 gm brown sugar
25 ml honey
1/8 tsp. ground ginger
1/8 tsp. ground cinnamon
1/8 tsp. ground cloves
1/4 tsp. baking soda
75 gm all purpose flour

In a pan melt the butter on low heat. Add the sugar, honey and the ground spices. Let the mixture heat completely but do not bring to a boil.


Turn off heat and sift in the flour and baking soda. Knead into a soft dough. Wrap it on plastic wrap and refrigerate for about an hour. The dough will firm up.


Preheat oven to 375 F. If the dough is too firm let it sit on the counter top or on the palm of your hand. It should be soft enough to roll. However, it should not be soft. Roll it out on a working surface using a rolling pin, Using a cookie cutter or the rim of a small cup cut the circular cookies. Place them on a cookie sheet.


Bake for about 8 minutes. Watch closely. They do burn quickly. Transfer to a cooling rack and cool completely.


The cookies will darken and harden a little.


Enjoy!


Monday, December 22, 2014

Turkish Mushroom Pide (Pizza)

A few months ago I tried Turkish pide (pizza) for the first time. Everyone in the family loved it. I decided to make the pide again this week and accordingly bought the feta cheese and a large tub of baby spinach. Unfortunately, I used up the spinach for something else. The sourdough was ready but I had nothing for the stuffing. There were some shitake mushrooms in the refrigerator that I had bought for a different meal. I used those with the feta cheese and roasted red bell pepper paste. No spices except some black pepper. I added basil for some additional flavor. The kitchen smelled really good so I knew it would taste good. My daughter took it as packed lunch and I got a text sometime in the afternoon letting me know that lunch was very good. In fact she has asked me to forget about the spinach recipe and make this filling again.


These pide were prepared and baked early in the morning before sunrise. The pictures were taken on a cloudy morning just after sunrise. I am a complete novice when it comes to pictures in artificial light.

You will need (for 4 pide)
Prepared Pide dough
15-20 shitake mushrooms
1 tbsp. olive oil
1/2 onion
a handful feta cheese
4 tbsp. red bell pepper paste
salt and pepper to taste

You will have to prepare the pide dough as per this recipe a day in advance. You will need 4 portions of dough. Keep refrigerated until needed.

Roast a red bell pepper on the stove top on direct heat until charred. Wrap in aluminum foil and keep aside for 15 minutes. Unwrap the pepper. Remove the skin and seeds. Chop coarsely and puree in the blender. Use as needed.

Dice the onions. Heat oil in a pan and saute the onions until tender. Turn off heat and allow the onions to cool. Meanwhile clean the mushrooms by wiping the tops and bottoms with a wet paper towel. Throw away the stem. Slice the mushrooms and keep aside. In a mixing bowl combine the cooled onion, mushrooms, feta cheese and red bell pepper paste. Add salt and pepper to taste. Go easy on the salt as feta cheese has a lot of salt.


Mix well but do not mash the mixture. Keep aside until needed.


Preheat oven to 400 F.
Take one ball of dough from the refrigerator and transfer to a floured work surface. Flour the rolling pin and roll out into an oval shape about 1/4 in thick. Keep aside and repeat with another ball of dough.


Place the filling in a thick layer leaving an inch on all sides.


Fold the edges in along the sides and twist together at the end.


Transfer to a baking sheet covered with parchment paper.


Bake for 10-15 minutes or until the filling is bubbling and the crust is turning brown. Repeat with the remaining two portions of dough.


Enjoy!


Friday, December 19, 2014

Green bean casserole

Green bean casserole is another must have at our Thanksgiving table. My daughter absolutely loves it and insists I make it every year. This year she made it herself. It is a dish that I am not particularly fond of. If I had my way I would stop making it. Instead I always make it as a double batch so she can have leftovers.


When I first started gathering recipes for the Thanksgiving meal I picked this recipe as it was easy to put together. Over the years I have tried to talk my daughter into letting me make the mushroom soup instead of using a can but she won't hear of it. She is afraid I will ruin the taste of the casserole. Even though I never buy canned soup, this is my one exception.

You will need
10 ¾ ounces (1 can) cream of mushroom soup (I use Campbell)
½ cup milk
1 (16 ounces) bag frozen green beans, not thawed or cooked
1 1/3 cups French-fried onions, divided

Preheat oven to 350F. Do not thaw the beans before use. They will become soggy. Use directly from the freezer.

In a casserole dish mix soup, milk, pepper, green beans and 2/3 cup fried onions. Bake for 25 minutes  uncovered or until hot. Take it out of the oven and stir. Sprinkle with remaining onions and bake for another 5 minutes.


Enjoy!


Thursday, December 18, 2014

Creamy mashed potatoes with chives

Mashed potatoes with chives is one of our must have recipes at the Thanksgiving table. I got this recipe several years back when I started looking out for recipes for a traditional Thanksgiving meal. My daughter loves potatoes and mashed potatoes are her favorite. This is one of the original recipes that has not changed at all over the years. I have offered to make the cream from scratch using fresh chives but my daughter will not allow it. And so every year we go looking for the cream cheese with onions and chives before the stores run out. Luckily, we all like the recipe and it is also liked by the visiting extended family. Thanksgiving would not be complete without it.


These mashed potatoes taste best with Yukon gold potatoes. They are available in every supermarket before Thanksgiving. However, just before Thanksgiving they usually sell out. One year I forgot to stock up early and had to go looking for them the day before Thanksgiving. I had a very hard time finding them. I had to go from store to store until I found a few in one of the stores. Stock up early if you plan on making mashed potatoes using Yukon gold potatoes.

You will need
3 lbs. peeled Yukon gold potatoes
2/3 cup nonfat milk
1 tsp. salt
2/3 cup light cream cheese with chives and onion

Wash and peel the potatoes.


Quarter the peeled potatoes.


Place the potatoes in a Dutch oven, and cover with water. Bring the water to a boil. Reduce heat, and simmer for 10 minutes or until the potatoes are tender. Drain. Return potatoes to pan. Add the milk and salt. Mash the potato mixture with a potato masher to desired consistency. Add the cheese, and stir just until blended. Mashed potatoes are ready.


Enjoy!

Wednesday, December 17, 2014

Cranberry Sauce

I first made this Cranberry sauce for Thanksgiving back in 2007. It was the first time I had bought and used cranberries. I have made this sauce every year since then.


 I make it in small quantities and it adds a sweet and tart flavor to the meal.


Over the years I have changed it a little with organic ingredients, fresh squeezed juice and extended cook time. What I really like about this sauce is that it is tart and sweet at the same time. It can be used as a spread or substituted for jam if needed.

You will need
6 oz. fresh organic cranberries
1/2 cup sugar
1/2 cup fresh squeezed orange juice


Add all the ingredients to a medium saucepan and bring to a boil. Simmer until berries pop. Mash gently with the back of a spoon or masher. Let the sauce simmer for about 3-5 minutes more.


Turn off heat. Chill until ready to serve. The sauce thickens as it cools.


Enjoy!

Roasted Vegetable Sliders / Baked Sandwiches

Sliders are sandwiches made with small buns. These delicious sliders are made with sourdough dinner rolls and stuffed with roasted vegetables. They are extremely flavorful and are usually gone very quickly. I remember the first time I made them. My daughter came running to the kitchen when she realized I was baking dinner rolls. I had not made pav bhaji for a few weeks and she thought I was making pav bhaji. When I told her what I was up to she was not very convinced she would like it even though she loves roasted vegetables and dinner rolls separately. I told her to try it before passing judgement. Once she tried this combo she loved it.


You can use any dinner rolls for these sliders. Remember to reduce the size of each bun when you bake them (about 70 gm, no more than 80 gm). The boursin cheese on the bottom prevents the rolls from getting soggy and adds a different classic flavor. If this cheese is not available where you live you can use butter.

You will need
10 dinner rolls
1 batch roasted vegetables
1/2 cup shredded sharp cheddar cheese
5 tbsp. boursin cheese (I used chives and garlic flavor)
1 tsp. olive oil
1/2 tsp. dry basil

Prepare dinner rolls. You could make sourdough rolls, 50% whole wheat rolls or 100% whole wheat rolls. You could also use store bought rolls. Prepare roasted vegetables as per these directions.


Preheat oven to 350 F. Shred the cheese and keep aside. Work with 5 or 6 rolls at a time. Without breaking them apart slice the rolls in half. Remove the top half and keep aside. On the bottom half apply boursin cheese and place on a baking tray. Arrange all the buns on the tray with sides touching each other. Though the pictures here are of a smaller batch I have made up to 15 buns in a single batch.


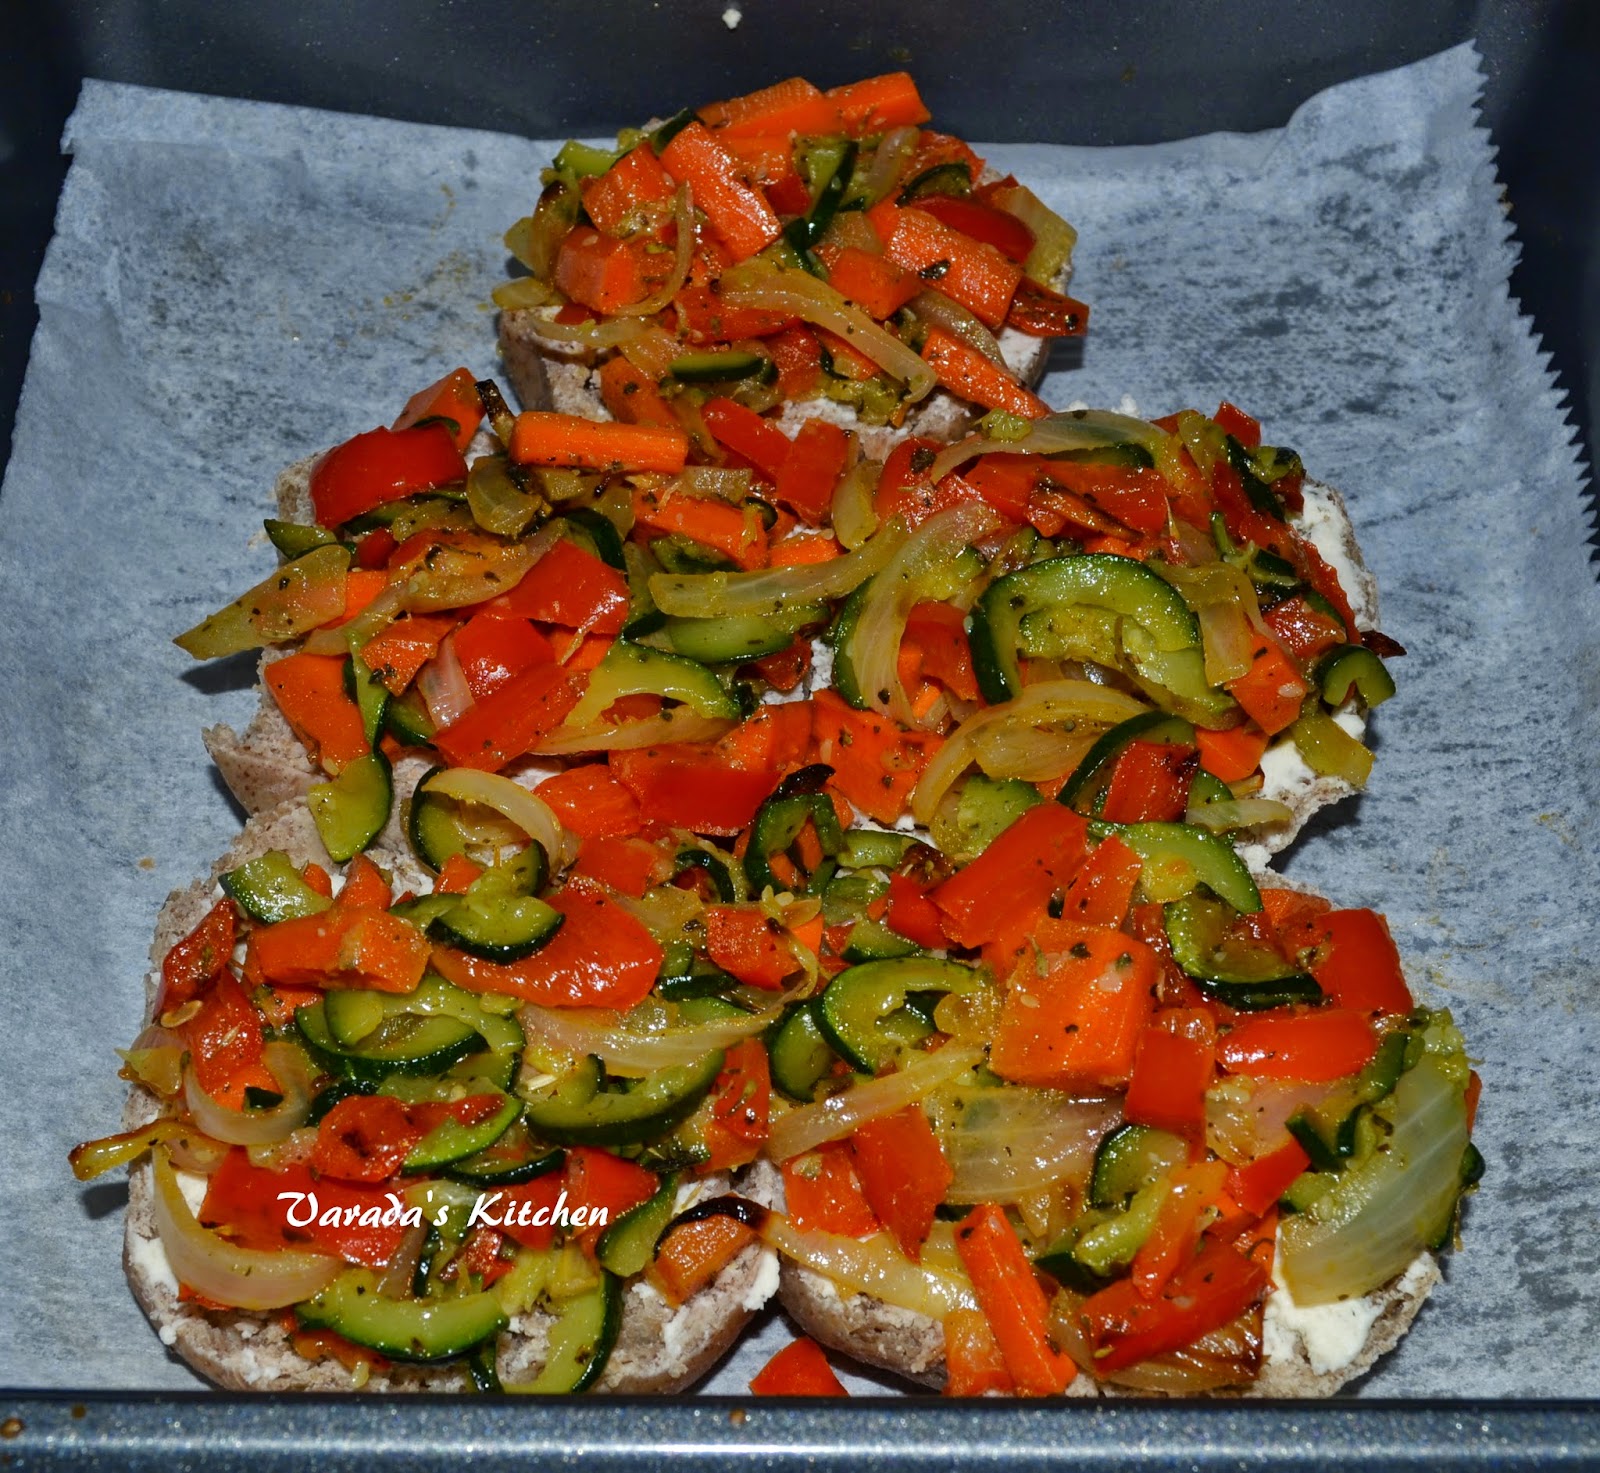
Add the roasted vegetables liberally. Don't worry if they form a layer overlapping the buns. It will all work out.


Add the shredded cheese. Cover with the top half. Brush the oil on the top and sprinkle crushed basil over it.


Bake for 15 minutes covered with foil. Then bake open for another 15 minutes or until the cheese melts.


Pull apart and enjoy them hot out of the oven!


Monday, December 15, 2014

Roasted Vegetables

If you like vegetables then this one is for you. In my house everyone loves vegetables and these are special favorites. I used red bell pepper, carrots, zucchini and yellow onion. You can use any other combination of vegetables. Broccoli, baby corn, bell pepper of all colors etc. would make good candidates.


My daughter loves these very much. In fact she likes all vegetables. When she was a toddler I had a grand vegetable garden in the backyard. When she asked for a snack she got a little basket. She took it outside and picked tomatoes, cucumbers, spinach, green bean pretty much whatever caught her eye in the garden. I would wash them for her and that would be her snack with a cup of milk. She developed a taste for fresh vegetables with nothing added to them. Even today if you were to present her with a bowl of fresh broccoli and a separate bowl of potato chips she would reach for the broccoli. And not because it is healthy but because she loves it.


Needless to say roasted vegetables are loved in my house. Roasting vegetables with a hint of oil, salt and pepper really brings out their flavor. The vegetables can be used as pizza topping, inside sliders or eaten as a side.

You will need
2 carrots
2 small zucchini
1 red bell pepper
1/2 yellow onion
1 tbsp olive oil
salt and pepper
basil and thyme

Wash and peel the carrots. Cut them into 1 inch pieces. Cut the zucchini lengthwise and then into semi circles. Cut the bell pepper in half. Remove the seeds, cut into strips and then into 1 inch pieces. Peel the onion and cut slices.

Preheat oven to 400 F. Place all the cut vegetables on a baking sheet. Drizzle olive oil. Add salt and pepper.


Mix together and spread it around the baking sheet. Bake for 10 minutes.


Remove from oven and using a spatula mix them all up. Bake another 10 minutes. The vegetables are done.


Use with other recipes or enjoy as a side.