Wednesday, May 21, 2014

Bharli Wangi

Bharli Wangi is a Maharashtrian delicacy. It is made with small lemon sized eggplant. Roasted dry coconut flakes, peanuts, sesame seeds and tamarind is what gives it the distinct taste. Kala masala (black masala) a unique masala with a very limited shelf life adds to the flavor. When you see the tiny eggplant in the grocery store think of Bharli Wangi.


My mother used to make these often. I am not fond of eggplant but I loved the masala filling. In classic Maharashtrian style the filling is sweet, tart and savory all at the same time. This dish has no onion, ginger or garlic but it is finger licking good. Look here for more information on Maharashtra.

I did not have any plans for making bharli wangi. But I had an appointment at 9 am and reached the area at 8:15 am. I needed to kill time so I decided to walk through a grocery store that I had never been to before. As I walked through the vegetable section I spotted the tiny eggplants. I bought 10. I knew I had everything else I needed in the pantry so on the spur of the moment I decided to make Bharli Wangi for dinner.


You will need
10 tiny eggplant
3/4 cup dry coconut flakes
2 tbsp. sesame seeds
1/3 cup dry roasted peanut powder
1 tbsp. jaggery
1 tsp. paprika
2 tbsp. kala masala
1/4 cup fresh coconut, grated
1/4 cup cilantro, chopped fine
1 tbsp. tamarind paste
5 tbsp. olive oil, divided
salt to taste
1 tsp. mustard seeds
1 tsp. turmeric powder
1/4 tsp. asafoetida

Wash the eggplant and cut off the stems. From the same side as the stem cut the eggplant along the length without going all the way. Now make another cut perpendicular to the first. Repeat for all the eggplants. Soak the eggplant in salted water. Keep aside.


In a pan roast the coconut flakes and sesame seeds.


Grind them to a fine powder. In a bowl mix together the coconut flakes and sesame seeds powder, roasted peanut powder, jaggery, paprika, kala masala, fresh coconut, cilantro and salt with 2 tbsp. of olive oil. Use about a forth of a cup of water to form a paste.


Drain the water from the soaking eggplants. Keep aside about 2 tbsp. of the paste filling. Use the rest to stuff the eggplant. Gently separate the sides of the eggplant and push the filling inside with your fingers. Repeat for all the eggplants. Keep aside.


Heat 3 tbsp. of olive oil in a pan and add the mustard seeds. When they crackle add the turmeric powder and asafoetida. To this add the stuffed eggplant. Let them cook for a couple minutes. Using tongs turn them over. Cover and let them cook for 5 minutes.


Uncover and turn over again. Repeat the process until the eggplant changes color on all sides and is almost cooked all the way through.


Add tamarind paste to the 2 tbsp. of filling that was saved. Add 1/4 cup water (more if you like liquid gravy) and mix together. Add this to the eggplants in the pan, cover and cook for another 5 minutes.
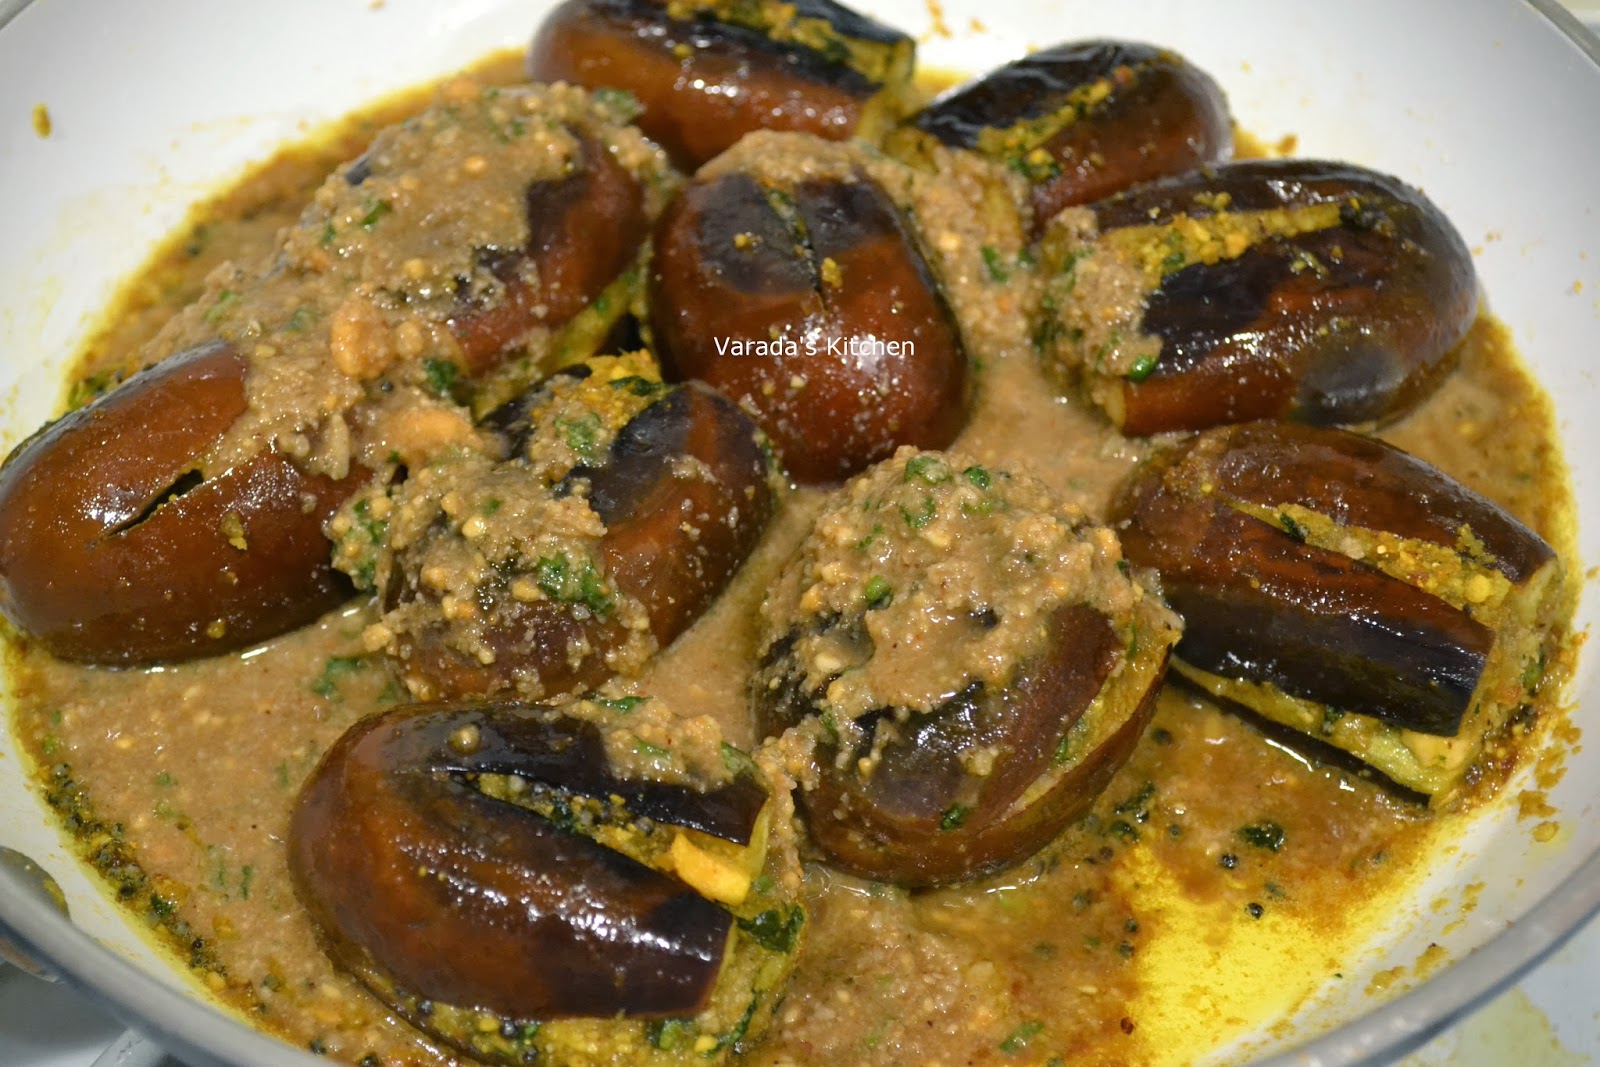

Uncover and check seasoning. Add salt if needed. Continue cooking until the eggplant is cooked completely. Be gentle while handling the eggplant. You do not want to break it apart.


Serve hot with poli.

Tuesday, May 20, 2014

Foolproof Sourdough Burger Buns

The challenge this month for Sourdough Surprises was to bake a bun, any kind of bun. I have had a personal challenge baking buns. The last couple of times I tried sourdough buns the shape was all wrong. I figured I had too much liquid and tried to fix that but it did not help. I was a little skeptical about my chances of doing this right.


Then I had a brainwave. I found a sourdough bun recipe and used it to mix the dough. After that I did not follow the recipe. You see, in the last few months I have tried a few bread recipes from Flour water salt yeast written by Ken Forkish. He recommends folding instead of kneading, 5 hour bulk fermentation followed by overnight proofing in the refrigerator. I decided to follow the same steps for the buns as I had done for the bread. I have to say I really like the results. I have to thank sourdough surprises for motivating me to try baking buns again. I have baked these buns twice now with identical results.


The dough was sticky and wet when it was mixed. After the third fold it had a lot of structure and held its shape well. After the bulk fermentation it was fairly easy to handle and shape.

Dividing the dough into identical portions was easy. First I flattened the dough a little into a shape of a circle. I then cut pie shapes out of it to get identical shaped portions. It is much easier to cut a circle than a square or rectangle.


The shaping of the dough used to be a challenge for me until I found two helpful sources. The first is a video on shaping bread and the second is a visual picture guide for shaping dinner rolls. I followed the visual guide to shape the buns and then I followed the video to create surface tension in them by sliding the buns on the work surface.

The shaped buns were covered and refrigerated overnight. Next morning they went from the refrigerator to the oven with a few minutes on the kitchen counter while the oven preheated.

You will need (For 10 buns)
200 gm 80% sourdough starter
365 gm water
80 gm sugar
1 egg yolk
80 gm olive oil
660 gm bread flour
16 gm salt

sesame seeds
egg white from 1 egg

In a bowl combine the starter and water. Mix the sugar, egg yolk and olive oil. Sift the flour and salt. Add it to the wet ingredients. Mix until all the ingredients are blended in, cover and keep aside. In the next hour fold the dough 2-3 times. Bulk ferment for 4 more hours. Lightly flour a work surface and transfer the risen dough on to it. Divide into 10 equal portions. Shape each portion into a bun and place on a baking sheet covered with parchment paper.


Cover the baking sheet and put it in the refrigerator to proof overnight. Take the baking sheet out of the refrigerator the next morning. Preheat the oven to 375 F while the buns rest on the kitchen counter. Wash the buns with the egg white and sprinkle a few sesame seeds on each one.


Bake for 30-33 minutes or until a tester comes out clean.


Cool on a rack and use as needed.

Monday, May 19, 2014

Sourdough Pizza

Pizza is just flat bread with toppings and can be made with different types of dough. Everybody who has ever tasted pizza has their favorite pizza sauce and toppings. However, it is not the toppings that make a pizza, it is the dough.


The dough does not have to be made with a sourdough starter but it needs good cold fermentation. Pizza dough kept in the refrigerator for a day or two produces better tasting pizza. The cold temperature allows the flavors to develop. So the next time you make pizza whether with instant yeast or sourdough, all purpose flour or high gluten wheat, thick crust or thin leave the dough in the refrigerator for a day. You will notice the difference in taste.


Pizza dough is flat bread that is very versatile. I used a mix of white whole wheat and all purpose flour for the dough. I fed my starter in the morning. At around 4 pm I mixed the dough. At night before going to bed I divided the dough and rolled it into smooth balls. I covered them and put them in the refrigerator.

The next day around noon, after 12 plus hours of refrigeration, I was ready to bake the pizza. Sometimes if I can, I keep the dough refrigerated longer; until dinner or maybe even lunch the day after. The pizza tastes better.


Today I made pizza topped with my favorite pizza sauce and shredded cotijo cheese. That was the only cheese I had on hand.

Preheat the oven to 475 F. If using a pizza stone and peel, place the stone on the top rack in the oven as it heats. If using a pizza baking sheet, place the sheet on the top rack. A hot oven and a hot cooking surface allow the pizza dough to cook quickly and puff up to create an open crumb. All you need is 7 minutes in the oven.

Meanwhile, on a lightly floured working surface place one of the portions of refrigerated dough. Using your knuckles punch down the center leaving a small 1/4 inch border.


Flour you hands. Pick up the flattened dough with your fingers and using the border as a guide run it through your fingers. Holding the dough up vertically will allow it to expand. You could throw it in the air to expand it too.


Remove the heated baking sheet from the oven. Working quickly place the prepared pizza dough on the sheet.


Cover with sauce and sprinkle the cheese. Return the sheet to the top rack of the oven for 5 minutes. If using a pizza stone, assemble the pizza on a pizza peel and slide it on to the hot stone.


After 5 minutes switch to broil and broil the pizza for 2 minutes. Serve hot. Be prepared to listen to how tasty the pizza is knowing the compliments are for the pizza base and not the toppings.


For the exact list of ingredients refer to the book Flour Water Salt Yeast by Ken Forkish.

Pizza Sauce

Homemade pizza sauce using fresh ingredients enhances the taste of any pizza. This sauce is a favorite with my family. We like it because it is very versatile. You can change the ingredients based on what you have in the pantry. While tomatoes are used as the base, there is no need to buy a specific kind. You can use any type of tomato in this sauce.


Ideally you would use vine ripened salad tomatoes preferably from a farmer's market. But if the only tomatoes you can find are the barely ripe grocery store variety then use a handful of cherry or grape tomatoes with it. Roma tomatoes or tomatoes or different colors everything works. Add them to some onion, garlic and oregano and you have great tasting pizza sauce.


You will need (for 6 hand tossed 10 inch pizzas)
28 oz of chopped tomatoes (6 salad tomatoes or 4 salad and 12 cherry or any other combination)
1/4 cup chopped onion
3 tbsp. olive oil
2 cloves garlic, peeled and minced
1 tbsp. dried oregano
1 tbsp. sugar
1 tbsp. fresh oregano (use dried if fresh is not available)
salt and black pepper to taste

Heat the oil in a saucepan. Add the chopped onion and cook until translucent. Add the garlic and dried oregano. Mix together until fragrant.


Add the tomatoes, sugar, salt and pepper. Cook for 15-20 minutes on medium heat until the tomatoes are completely mushy. Turn off heat and let it cool down.


At this point you can mash them, use a hand blender or transfer to a blender/food processor and puree. Add fresh oregano and continue to cook the mashed/pureed sauce for another 5 minutes. Turn off heat and cool completely.


You can store it in an airtight container in the refrigerator for up to 3 weeks.

Variation:
Add half a red bell pepper to the sauce.

Sunday, May 18, 2014

Sourdough Focaccia with Parmesan Cheese and Basil

Ever since I heard about and researched sourdough starter I wanted to bake bread using my own starter. For the last month and a half I have been baking bread using my starter. I baked soda bread, baguettes, hot cross buns and artisan loaf. Now I wanted to try pizza using my starter. The plan was to have pizza for dinner. But then I remembered I had baked focaccia caprese using commercial yeast a few months back and my family loved it. So I decided to make enough dough for four small pizzas and one focaccia.


My weekly baking cycle begins on Friday morning when I remove the starter from refrigerator and feed it. On Saturday morning I discard most of the starter and feed the remaining. I make sourdough pancakes for breakfast out of the discarded starter. On Saturday evening I mix the dough. For more on the process of maintaining your starter look here. Now that I use my starter I have become very conscious of the bread crumb and flavor. High hydration and long fermentation weaken the gluten strands giving bread the desired open crumb (lots of holes) and great flavor.


I used whole white wheat and all purpose for this recipe. My ultimate goal is to eliminate the all purpose flour in the dough and substitute it with other flours. I put the mixed dough in a covered mixing bowl on my kitchen counter to allow the starter to do its magic. After 7 hours I divided the dough into 5 portions, covered them and placed them in the refrigerator to proof. This was done at night so the light is not great in the picture.


The next day morning I took the portion I needed for the focaccia out of the refrigerator. I allowed it to continue to proof at room temperature for a couple hours.


I transferred the dough to a floured work surface and patted it into shape. I placed it on an oiled baking sheet and dug holes on the surface.


I then sprinkled fresh grated Parmesan cheese and some dried basil over the top.


I baked it for about 15-20 minutes in a hot oven set at 500 F.


The taste was amazing and I was really happy with the open crumb.


For the exact list of ingredients refer to the book Flour Water Salt Yeast by Ken Forkish.

Saturday, May 17, 2014

Artisan 75% Whole Wheat Hybrid Bread

I have always loved baking but I particularly like baking bread. After baking a whole array of breads using commercial yeast I decided to make my own levain or sourdough starter. I started Bubbles (as she was called) a couple months ago. She was active and bubbling for about 2 weeks and I was able to bake soda bread and Baguettes with her. But then she started smelling like nail polish and had to go.


That was when I realized I needed information about how a sourdough starter worked before I could start a new one. I found a Facebook group Artisan Bakers and that changed everything. People in that group were baking the kind of bread I had drooled over. True artisan bread loaves! I started gathering information. I bought Ken Forkish's Flour Water Salt Yeast on my Kindle app and read it end to end. It has a lot of information about bread making with commercial yeast and homemade starters. I would highly recommend it to anyone venturing into this area.


I started Bubbles II based on instructions in the book. I use King Arthur Flour for baking. After baking a few breads from the book on a baking sheet I invested in a couple of toys, a dutch oven and a pastry blender. Forkish breads in the book are all baked in a dutch oven. This is my first attempt at baking bread in one.


I started my baking cycle on Friday morning. Here is more information about feeding and maintaining your starter if you are interested.

On Saturday morning I fed the starter around 7 am and we all had sourdough pancakes for breakfast with the discarded or spent starter. I kept aside the fed starter for 6 hours.


After 6 hours I mixed the flour and water with the starter.


As per my baking plan I have about 100 gm of starter left over and that goes into the refrigerator until the next baking cycle starts on Friday.


Since this recipe is a Hybrid bread it uses a scant 1/8 tsp. of commercial yeast. I added the yeast along with salt to the bowl with the flour, water and levain and made a sticky dough from it. By this time it was 4 pm. I let the dough rest covered for 5 hours on the kitchen counter.


During the first hour I uncovered and folded the dough a couple times. Folding strengthens the dough.


By 9 pm after 5 hours the dough had risen to more than double the volume.


I transferred the dough to a floured board to be divided and shaped. I placed the shaped dough seam side down in a floured dry bowl, covered it and put it in the refrigerator overnight. I would love a Benetton or a cane proofing basket but that will have to wait. I do not like to buy too many toys at once.


On Sunday morning about 12 hours after the bowl went into the refrigerator I set the oven to preheat to 450 F with the lidded dutch oven inside.


When the oven was hot I removed the dutch oven and placed a parchment paper on the bottom. Next I took out the shaped dough from the refrigerator.


I inverted it and placed it seam side up in the hot dutch oven.


I replaced the lid and returned the dutch oven to the middle rack of the oven. I let it bake for 25 minutes with the lid on. Then I removed the lid and let it bake uncovered for another 15 minutes. When done I slid the bread out to a cooling rack. Inverting the shaped bread puts the seam side up. As the gas build in the bread the seam is ripped open.


This bread has a crispy crust but the crust is so thin that it is never hard to chew. The bread is very soft and very flavorful. I do not believe I could go back to a regular loaf of bread. The ultimate goal is to retain the gas in the dough during the shaping to ensure an open crumb. I got a fairly even crumb but not as open as I would have liked. I am working on getting that right.


This bread is great for sandwiches. For the exact recipe refer to the book Flour Water Salt Yeast by Ken Forkish.


Enjoy!