Thursday, June 25, 2015

Blueberry Yogurt

Fruit with yogurt is very popular in summer and flies off the shelves. You can make this fruit flavored yogurt at home. All you need is your favorite yogurt and some fruit. I used fresh blueberry. You can use any fresh berry or stone fruit. My daughter is not very fond of the store bought versions but she loves this homemade version. The sauce can be made ahead and you can have a bowl every day of the week.


The recipe is really simple.

You will need
1 cup yogurt
3 tbsp. blueberry sauce

Layer the two as desired. If you like it all mixed in whisk the two together.


Enjoy!


This is my entry for week four, day two of BM #53 for the theme Fruits in any form. Check out the Blogging Marathon page for the other Blogging Marathoners doing BM#53.

Friday, June 19, 2015

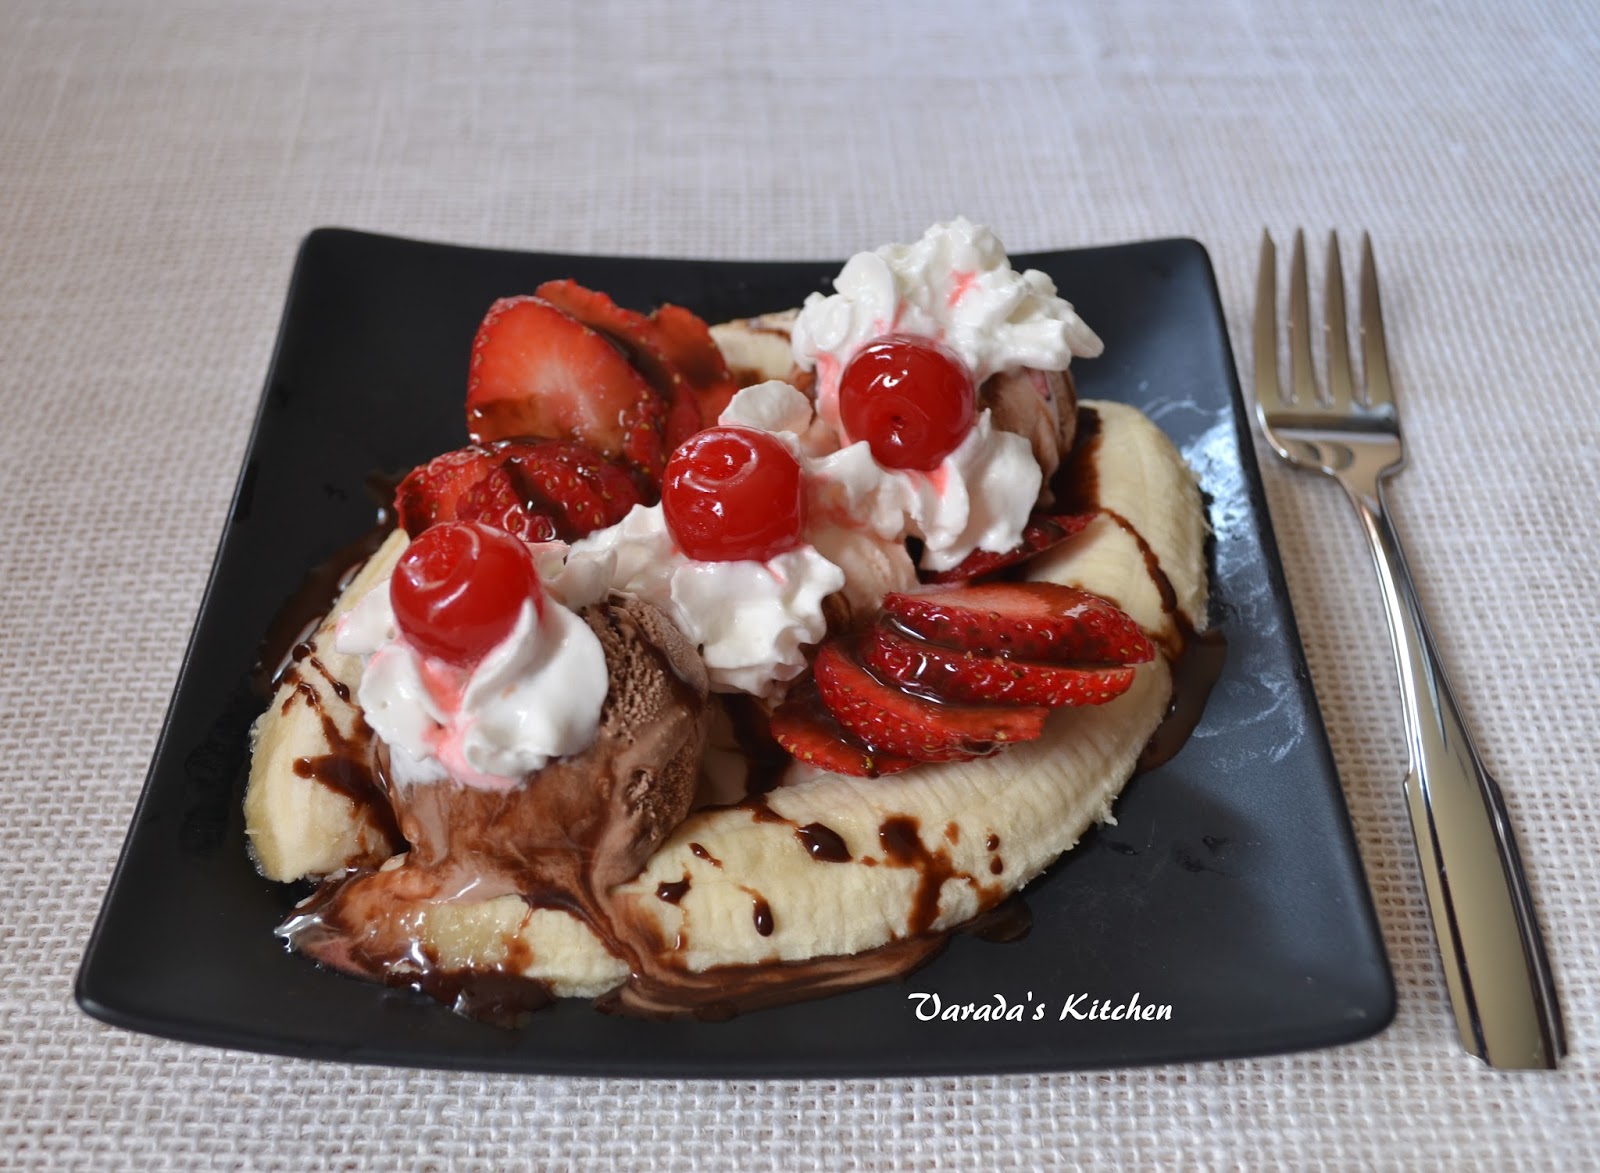
Banana Split

A long time ago when there were fewer responsibilities, when there was no homework to worry about and before there were early bedtimes to adhere to, going out every evening after dinner was the norm. My husband and I would go out with friends, to the mall or sometimes we stopped for some ice cream. At the ice cream shop we would order a banana split and share it. Banana split always brings a smile to my face as all those memories come flooding back.


Recently my daughter told me she had never tasted a banana split. While I am pretty sure she has I realized I had not made it for such a long time that she did not remember it. So I made some. I used the traditional chocolate, strawberry and vanilla flavored ice cream, chocolate sauce and some fresh strawberries. My daughter loved it.


This dessert is really filling so you might want to use small scoops to control portion size. Or split the dish between two people.

You will need (for 1 banana split)
1 just ripe banana
1 scoop chocolate ice cream
1 scoop vanilla ice cream
1 scoop strawberry ice cream
2 tbsp. whipped cream (adjust to taste)
2 tbsp. chocolate sauce
3 maraschino cherries

You may choose to buy whipping cream and make your own whipped cream. You can also make chocolate sauce at home or get store bought.

To assemble prepare the plate. You can use a special elongated dish or use a flat plate like I did. First peel and cut the banana along its length. Place it on the plate such that there is just enough room in between the two pieces to place the scoops of ice cream. Place the scoop of vanilla ice cream in the center and the chocolate and strawberry ice cream on either side. Add the chocolate sauce and the whipped cream. You can add nuts or fresh fruit. Place the cherries on top of each scoop of ice cream. Serve immediately.


Enjoy!

This is my entry for week three, day two of BM #53 for the theme Ice cream all the way. Check out the Blogging Marathon page for the other Blogging Marathoners doing BM#53.

Thursday, June 18, 2015

Falooda

Falooda is one of those desserts that I loved the first time I tried it. However, for years I lived in a relatively small town where not only could you not find a creamery or ice cream shop that sold falooda but you could not even find a store that sold the ingredients. It was such a pleasant surprise to find grocery stores with all the ingredients when we moved to Texas. And then we found a creamery that sold some great tasting falooda.


For some reason my daughter does not like this dessert. My husband and I do not go out just for dessert and so we have not been to the creamery in a long time. Last week I ended up with a lot of ice cream in my freezer and this is one way I decided to use it. 

You will need
1 tsp rose syrup
1 tsp. basil or sabja seeds
2 tbsp falooda noodles
1 cup milk
1 tbsp condensed milk
2 small scoops vanilla ice cream
crushed nuts to garnish

Soak the basil seeds in a 1/2 cup of water for about 15-20 minutes. Soak the falooda noodles in water until soft. In a tall glass add the rose syrup. Drain the basil seeds and add them to the glass. Drain the noodles and add them over the top. Add the milk and condensed milk. Scoop in the ice cream. Gently stir the mixture but do not allow the layers to mix completely. Garnish with nuts and serve.


Enjoy!


Wednesday, June 17, 2015

Chocolate Sundae

Summer is right around the corner and the mercury is shooting up. Schools are out and the kids are enjoying their new found down time. The afternoons are so hot, everyone is looking for something to cool down with. Ice cream fits the bill perfectly. It is even better if the ice cream is decorated with chocolate sauce and whipped cream. That brings me to this sundae. It is easy to put together. You can make your own chocolate sauce like I did or use store bought sauce. You can whip up the whipped cream or buy it at the store. A few crushed nuts on the top add a nice crunch.


The other day I asked my husband to get a small tub of ice cream to make some ice cream soda. He bought two large tubs. He had a pretty good reason for buying so much ice cream but I cannot remember what it was. You cannot return ice cream so I had to use up the two tubs. As a treat my family got to eat some new and old favorites with ice cream. Watch this space for more.

You will need
2 scoops vanilla ice cream
1 tbsp. or more chocolate sauce
whipped cream as needed or whip heavy whipping cream
chopped peanuts
maraschino cherry (optional)

To assemble: If using heavy whipping cream whip it until light and fluffy just before using it. Scoop the ice cream in a bowl. Add the whipped cream. Pour chocolate sauce. Garnish with nuts and a cherry.


Enjoy!


This is my entry for week three, day one of BM #53 for the theme Ice cream all the way. Check out the Blogging Marathon page for the other Blogging Marathoners doing BM#53.

Friday, June 12, 2015

Tortilla Roll Diploma

This is the season for graduation, high school and college children finishing one phase of their life and moving on.  This is also the season for graduation ceremonies and parties with friends and families. My daughter graduated from high school this year and this is one of the dishes I made for her the week she graduated.


Time flies and it seems only yesterday I dropped her off at her first day of Kindergarten. She was looking forward to it so much, she could not wait to run into the classroom. When the teacher asked the children to line up, wave to the parents and walk into the classroom, she waved and never looked back. And now she is all done with school and is ready for college.


I used whole wheat tortillas from Whole Foods. I also used canned black beans and store bought salsa making this a semi homemade meal. I have not specified quantities as you can adjust them to your taste.

You will need
whole wheat tortilla as needed
cooked black beans as needed
tomatoes, diced
lettuce shredded
sour cream
salsa

Heat the tortilla in a hot pan. Flip over to heat both sides. Spread some sour cream on the tortilla. Place the black beans, tomatoes, lettuce and salsa over the tortilla. Roll it up and serve warm.


To make these for a graduation party cut a length of ribbon and tie it around the roll to make it look like a diploma.


Enjoy!

Thursday, June 11, 2015

Spinach Enchiladas in Red Sauce

Mexican dishes brings a big smile from my daughter at the dinner table. She loves the flavors from this cuisine. Authentic Mexican food was easily available in Arizona where she grew up. It takes a long time to prepare Mexican dishes but the taste is so worth it. Verde sauce is her favorite so I favor that sauce. Since moving to Texas my daughter has taken to Tex Mex, but I have not tried it at home yet. It is a spicier version of Mexican food and the couple of times I have tasted it I could not get past the spicy flavors to the actual taste.


I make this red sauce enchilada very infrequently. If you are not partial to verde sauce then you should try this version of enchiladas. I have stuffed the enchiladas with spinach. You could use plain cheese or any other filling of your choice.

You will need
7-8 tortilla
1/4 cup cheddar cheese
3 cups red enchilada sauce
1 cup filling

For the filling
1 bunch spinach
1/4 cup onion, shredded (optional)
1 /2 tsp. cayenne pepper powder
1 tbsp. olive oil
1/2 tsp. cumin powder
salt to taste

Wash and clean the spinach. Heat oil in pan and add the onions. Saute until translucent. Then add the spinach. If you are not using onions, add the spinach to the oil. Let it cook until wilted but not mushy. Add cayenne pepper, salt and cumin powder. Let it cook a couple more minutes. Turn off heat and allow to cool completely.


Preheat oven to 350 F. In a baking casserole dish ladle enough red sauce to cover the bottom. Prepare the enchiladas.  On a flat surface place the tortilla. Fill the center with the cooked spinach and a little cheese.


Fold in the sides and then starting from once end roll all the way to the other end. Place the prepared enchilada in the baking dish. Continue with the other tortilla, placing them in the dish next to each other, open side down.


When all the tortilla are placed int he dish, ladle the remaining sauce over the top.


Sprinkle the remaining cheese. Cover with foil and bake covered for 20 minutes. Remove the foil and bake another 5 minutes. Let it rest out of the oven for 5 minutes and serve.


Enjoy!


Wednesday, June 10, 2015

Tortilla Chips

Baked tortilla chips are so quick to make especially if you start with ready made tortilla. Making the tortilla is time consuming and I will post the recipe but today I took some help. I got these tortilla from Whole Foods. They are fresh made corn tortilla and do not last very long. You have to use them in a day or two.


You will need
4 corn tortilla (as fresh as you can get)
2 tsp. oil

Preheat oven to 400 F. Brush each of the tortilla with a little oil. Using a pie cutter or knife cut the tortilla into wedges, I got six. Place them in a single layer on a baking sheet and bake for 5-8 minutes. If the tortilla you use are not fresh you may need to bake a little longer. Keep a watch so they do not burn.


Enjoy with salsa or in nachos!

This is my entry for week two, day one of BM #53 for the theme Tortilla based dishes. Check out the Blogging Marathon page for the other Blogging Marathoners doing BM#53.

Friday, June 5, 2015

Cinnamon Sugar Popcorn

Popcorn reminds us of the movies. It is the most popular movie theater snack. While the popcorn at the theater is flavored with artificial butter and coloring I used cinnamon sugar to flavor it. I have kettle corn in this space already. It is also a very popular movie theater option.


I made this as a change to the savory flavors I usually make. It has a very subtle sweet flavor.

You will need
1 cup corn kernels
1 tbsp. oil
1 tsp. cinnamon powder
1 tbsp. sugar

Heat a pan and add the oil and corn kernels. Keep the heat on medium and cover the pan. When the kernels begin to pop turn down the heat. When the popping sound stops take the pan off heat. Combine the cinnamon and sugar and sprinkle them over the popcorn.


Enjoy!

Thursday, June 4, 2015

Raspberry Banana Smoothie

Raspberries are in season and make a nice sweet and tart smoothie. I love a brightly colored smoothie but raspberries do not make the most colorful smoothie unless paired with another berry. If you enjoy a certain amount of tartness to the smoothie you will like this. If you like your smoothies very sweet then try adding a mango or similar sweet fruit.


Over the years movie theaters have gotten very creative. The regular movie snack counters have expanded from the usual soda and popcorn to a variety of sweet and savory snacks. But it is the innovative theaters that serve food at your seat, anything from smoothies and snacks to a full meal. Berry and banana smoothies are very popular on this menu especially in summer. Now reclining seats with food trays attached may not be your kind of movie experience. But there is a huge clientele for it and these theaters are showing up everywhere. Personally I prefer the regular theaters with bucket seat that recline but not too much.


But I do enjoy a smoothie any day and this raspberry smoothie was no exception.

You will need
1 cup raspberries
1 banana
1/2 cup yogurt
1 1/2 cup milk
1 tbsp. sugar (optional)

Blend all the ingredients together until smooth and creamy.


Enjoy!


Wednesday, June 3, 2015

Nachos

Nachos make a great snack and I realized with surprise that I had not added this easy snack to this space earlier. The basic idea of nachos is a crispy base of corn chips topped with a variety of ingredients eaten with a gooey cheese sauce. At its simplest nachos can be chips and melted cheese. You can add additional layers of black beans, tomatoes, avocado or guacamole as you please. My daughter likes to add salsa and sour cream on the top.


Fresh made tortilla chips with layers of toppings and cheese sauce makes a great movie snack. It is a mobile snack that is great hot or cold so can be devoured slowly as you watch a movie. A very basic version is sold in movie theaters but we never get that. I prefer this easy homemade version instead.


The next time you plan a movie night add this you your list of snacks.

You will need
Tortilla chips to cover the plate/bowl
Black beans (dry soaked and cooked or you can use canned)
Tomatoes, diced
Avocado, seed removed and diced
Nachos Cheese sauce (recipe below)
Salsa
Sour cream

Nacho Cheese sauce
1 recipe basic white sauce
1/2 cup good quality shredded cheddar cheese

To prepare the sauce follow the basic white sauce recipe. When done add the cheese and continue to whisk until it is incorporated. Keep aside until needed.

To put the nachos together
In a plate layer the chips, top with beans, tomatoes and avocado. Add the salsa, sour cream (if using) and ladle the sauce over the top.


Enjoy!

Tuesday, May 26, 2015

Pineapple Tomato Pizza

Weekends are usually savored for the downtime from the mad week day rush. The menu on weekends is different from week nights but is usually simple. For years Friday night was pizza night. It would be movie night if we wanted to watch a good movie. Other weekends it would be game night where we played strategy and board games like Settlers of Catan. For the last few years Friday night has become the night to catch up on sleep for my high school going daughter. She has a quick dinner and sleeps for 12 hours straight. This pizza is a throwback to quieter Friday nights that were all about family time.


My daughter loves pineapple on pizza. I know this is not an authentic pizza topping but after years of eating it I have to say I like it too. There is something about the pineapple and the tomato that just go together. This pizza has a sourdough crust but would taste great with regular pizza crust too.

You will need
Pizza dough made as per this recipe
Pizza sauce 
Parmesan cheese as needed
Pineapple chunks as needed
dried oregano

Prepare the pizza dough and keep it refrigerated at least 24 hours for the flavor to develop. Preheat oven to 500 F. If you have a pizza stone heat it with the oven. If you use a baking sheet like me put it in the oven when the temperature reaches 400 F. Ensure you place the sheet / stone in the top rack. When the oven is preheated and the baking sheet / stone is heated through take the dough out of the refrigerator and shape it. Follow instructions in my original sourdough pizza recipe. Make sure you shape the crust as thin as you can for a thin crust pizza.


When done shaping the dough remove the heated baking sheet. If working with a stone assemble the pizza on a floured pizza peel. Place the pizza carefully on the sheet / peel. The dough is sticky and will stick together if it folds on itself. Spread a ladle of pizza sauce. Sprinkle shredded parmesan cheese over the sauce.


Arrange the pineapple chinks over the top. My daughter loves the flavor of pineapple on the pizza so I add a lot. You can add as many or as few pineapple chunks as you like.


Place the pizza sheet in the oven. If using a stone slide the pizza from the peel to the stone. Bake for 5-7 minutes. Switch the oven to broil and broil for 1-2 minutes until you see some charred spots.


Enjoy!

Monday, May 25, 2015

Udon Noodles with Roasted Vegetables

I had bought a packet of Udon noodles a few weeks back and knew it was still sitting in the pantry. I also had some left over zucchini and yellow bell pepper. My husband was travelling over the weekend so I thought I would make noodles for our weekend lunch. I had saved a really nice noodle recipe posted by Pavani but I could not find it in my bookmarks. I searched and found the recipe I was looking in her blog Cook's Hideout. We loved the noodles.


Pavani used Hakka noodles and I used Udon. Except for that I followed her recipe as best as I can follow a recipe. I am bad at following recipes and never make the same dish twice as I tweak something or the other. My daughter asked if I could add eggs to the noodles so I cracked a couple eggs on the side in the pan and mixed in the scrambled eggs. The base recipe is true to the source and it was very tasty.


I love roasted vegetables. Zucchini, bell peppers and onions release their flavors but retain their shape when roasted. Freshly roasted vegetables added to the sauteed onion, ginger and garlic with a hint of soy and hot sauce. What is not to like? Make sure you do not overcook the noodles. Dunk in cold water to stop the cooking and prevent them from sticking to one another.

You will need (3 servings)
6 oz. Udon noodles
1 zucchini
1 yellow bell pepper
1 carrot
3/4 onion
2 tbsp. oil, divided
1 tsp. ginger garlic paste
2 tbsp. soy sauce
1 tsp. siracha hot sauce (adjust to taste)
salt and black pepper
2 eggs (optional)

Preheat oven to 425 F. Chop the onion in 1 inch pieces. Reserve a third of the onion. Remove the seeds from the yellow pepper and chop into 1 inch pieces. Cut the ends off the zucchini and chop into 1 inch pieces. Peel the carrot and remove the ends. Chop into 1 inch pieces. Sprinkle a tablespoon of oil over the chopped vegetables. Add salt and pepper. Mix it all in and spread the vegetables on a baking sheet. Bake for 20-25 minutes or until the vegetables are cooked but not mushy.


Meanwhile bring water to a boil and cook the noodles as per instructions on the packet. Drain when done and dunk in cold water. Drain and keep aside.


When the vegetables are done take them out of the oven and keep aside. Heat the remaining oil in a pan and add the reserved onion. Saute the onion on high heat. until it starts to brown.


Add the ginger garlic paste, soy and siracha sauce.


Add the roasted vegetables, salt and pepper to taste.


If you are using eggs, move the vegetables to one side in the pan and crack the eggs in the space created. Let them turn translucent before mixing them up with the vegetables. Finally mix in the noodles. Toss to spread the flavor and turn off heat.


Enjoy!


This is my entry for week three, day two of BM #52 for the theme Weekend Special Dinner. Check out the Blogging Marathon page for the other Blogging Marathoners doing BM#52.

Sunday, May 24, 2015

Mushroom Burgers

Portobello Mushroom are large and have a lot of meat. When grilled they turn juicy and flavorful so they make ideal candidates for burger pattis. We first made the mushroom burgers on the grill years ago when we lived in Arizona. I make these on lazy summer weekends when were are hanging out in the backyard by the pool. This is one of those meals that can be cooked on your grill and eaten outdoors.


I made the burger buns without eggs and with 100% whole wheat because I did not have a recipe for that combination on my blog. I have my foolproof sourdough burger buns and the regular burger buns. Any of the recipes would work perfectly with these mushroom patti.

You will need (for 4 burgers)
4 burger buns, eggless recipe here, other recipes available here and here
4 portobello mushrooms
salt and pepper to taste
1 tsp. oil
2 tbsp. mayonnaise
slices tomatoes, as needed
lettuce, as needed
onion cut into rings, as needed
ketchup and mustard as needed

You can make the burger buns or use store bought buns.


The mushrooms cook very quickly so keep the other ingredients ready. Remove the stem from the mushroom. If you run the mushroom under water it will become rubbery. Using a moist towel wipe the mushroom clean. Place the mushroom top side down. Sprinkle salt and pepper on the underside of the mushroom. Sprinkle the oil. Fire up the grill or the broiler in your oven.


If using the grill place the mushrooms directly over the grill. If using the broiler place the mushroom on a baking sheet. It take about 2-5 minutes to cook the mushroom. Flip it over and give it another 2 minutes. Done.

Assemble the burger using all your favorite fixings.


Enjoy!


This is my entry for week three, day one of BM #52 for the theme Weekend Special Dinner. Check out the Blogging Marathon page for the other Blogging Marathoners doing BM#52.