Stromboli is a stuffed turnover. I had bookmarked this recipe a long time back but never got a chance to make it. My daughter loves stuffed bread a lot. I had made stuffed buns before and decided to use the same paneer and tomato filling for the stromboli.
My daughter helped me fold it and really did justice to the end result as well. The dough was crispy but not chewy and the filling was delicious. It was gone very quickly. Next time you are looking for a quick crowd pleaser try this recipe.
I made the dough as given in this link. It is the same as the recipe for Italian bread.
You will need
For the dough
3 cups flour (I used 50% whole white wheat and 50% all purpose flour)
1/4 oz. instant yeast
1 1/2 tsp. salt
1 pinch of sugar
1 cup warm water
1 tbsp. olive oil
1 tsp. dried oregano
For the filling
14 oz. paneer (directions for homemade paneer here)
2 medium tomatoes
1 tbsp. olive oil
1 tbsp. cumin seeds
1 tsp. turmeric powder
1 tbsp. dried basil
1 tsp. paprika (adjust quantity to taste)
salt
In a mixing bowl sift in the flour. Add all the dry ingredients. Pour in the water. Using hands moistened with water combine all the ingredients to form a soft dough. Using a half tablespoon oil on your hand knead the dough for 5 minutes until it is smooth and elastic. Cover and keep aside until it doubles in volume.
In the meantime prepare the paneer tomato filling. Follow the instructions here. The filling should be dry and cooled completely before use.
Flour a board and transfer the risen dough on to it. Using a rolling pin roll out a large rectangle. Transfer the prepared rectangle to a baking sheet covered with parchment paper.
Preheat oven to 400 F. Arrange the paneer filling along the center of the rectangle lengthwise as shown. Using a sharp knife or pizza cutter cut the dough around the filling as in the picture below.
Fold in the top end. Now starting on one side fold the alternating sides over to the middle at an angle.
Continue to the end. Before folding the last few pieces fold in the end to give it a neat finish. Continue folding in the sides over the end piece.
Drizzle a half tablespoon of oil over the top. Sprinkle dried oregano. Bake in the preheated oven for 18-20 minutes. You may use an egg wash if you want to get the golden brown color. I skipped that.
Cool on a rack for a few minutes. Slice and serve.
Enjoy!
Sunday, August 24, 2014
Tuesday, August 19, 2014
Shira / Sheera / Suji Halwa
The other day after a heavy lunch nobody was in the mood for a full meal for dinner. I offered to make upama when my daughter asked if I could make sheera instead. That was when I realized that I did not have the simple sheera recipe on this space. I have banana sheera and mango sheera but not the plain version. So I decided to set that straight and post this recipe right away.
If you choose to heat the milk and water in a microwavable cup use a mitten when pouring it over the rava. I learnt this the hard way when the steam burnt the fingers of my hand.
You will need
2 tbsp. ghee
1 cup semolina or rava
1 cup water
1 cup milk
1/2 cup + 2 tbsp. sugar
To garnish
Cashews
Raisins
1 pod cardamom
1 tsp. ghee
Heat the ghee in a pan and add the rava. Roast the rava stirring occasionally on low to medium heat taking care it does not burn. Do not let it turn brown.
Combine the water and milk in a microwavable cup and bring to a boil, anywhere from 1 and half to 3 minutes depending upon your microwave. Alternately heat the milk and water in a separate pan on the stove top.
Pour the hot liquid over the roasted rava. Stir to combine and cover. After a minute remove the lid and mix the rava with the now absorbed liquid. Cover and repeat another two times.
In a separate small pan heat the ghee for garnishing and add the cashews. When browned slightly add the raisins. When they puff up turn off heat. Add the cashews and raisins to the sheera. Shell the cardamom and pound the seeds. Add the powder to the sheera. Mix one last time and turn off heat.
Sheera taste great when it is warm.
If you choose to heat the milk and water in a microwavable cup use a mitten when pouring it over the rava. I learnt this the hard way when the steam burnt the fingers of my hand.
You will need
2 tbsp. ghee
1 cup semolina or rava
1 cup water
1 cup milk
1/2 cup + 2 tbsp. sugar
Cashews
Raisins
1 pod cardamom
1 tsp. ghee
Heat the ghee in a pan and add the rava. Roast the rava stirring occasionally on low to medium heat taking care it does not burn. Do not let it turn brown.
Combine the water and milk in a microwavable cup and bring to a boil, anywhere from 1 and half to 3 minutes depending upon your microwave. Alternately heat the milk and water in a separate pan on the stove top.
Pour the hot liquid over the roasted rava. Stir to combine and cover. After a minute remove the lid and mix the rava with the now absorbed liquid. Cover and repeat another two times.
In a separate small pan heat the ghee for garnishing and add the cashews. When browned slightly add the raisins. When they puff up turn off heat. Add the cashews and raisins to the sheera. Shell the cardamom and pound the seeds. Add the powder to the sheera. Mix one last time and turn off heat.
Sheera taste great when it is warm.
This is my entry for week three, day three of BM #43 for the theme Healthy Desserts. Check out the Blogging Marathon page for the other Blogging Marathoners doing BM#43.
This is also my entry for week 33 for the 2014 52 week challenge for the them Opposite side of the world.
Monday, August 18, 2014
Healthy Gajar Halwa (Carrot Halwa)
Gajar Halwa is usually a favorite with kids of all ages. It is a simple dessert that can be very rich or lightened up considerably. My health conscious mother always went for the lightened up version. I remember coming home from school and having warm freshly made halwa as a snack.
My husband has a sweet tooth and so does my daughter. But neither like the rich loaded version of halwa. Instead we all prefer this version. My father is visiting so I made this as part of lunch today.
I made a very small portion with two carrots because no one likes to eat big portions of desserts in my house.
You will need
2 carrots
1/4 cup milk (at least 1%)
1/2 tsp. ghee
For garnish
4-5 cashews
8-10 raisins
5-6 slivered almonds
1/2 tsp ghee
1 pod cardamom
Pressure cook the carrots whole until tender. In my pressure cooker this is 5 minutes with whistle on before turning off heat. For whistling cookers this would be one whistle. Let the pressure go down on its own before opening the cooker. Let the carrots cool.
Using a scraper or dull knife scrape away the skin of the carrots. It should come away very easily. Break the carrot open length wise and discard the uncooked center stalk. Mash the pulp lightly and keep aside.
In a pan heat ghee and add the carrots. Saute for a couple minutes and then add the milk. On low heat let the mixture thicken.
Meanwhile heat the ghee for garnishing in a separate pan and roast the cashews, almonds and raisins. Keep aside.
When the carrot mixture thickens turn off heat. Shell the cardamom and crush the seeds to a powder. Add this powder and the roasted nuts and raisins to the halwa.
Enjoy!
This is my entry for week three, day two of BM #43 for the theme Healthy Desserts. Check out the Blogging Marathon page for the other Blogging Marathoners doing BM#43.
My husband has a sweet tooth and so does my daughter. But neither like the rich loaded version of halwa. Instead we all prefer this version. My father is visiting so I made this as part of lunch today.
I made a very small portion with two carrots because no one likes to eat big portions of desserts in my house.
You will need
2 carrots
1/4 cup milk (at least 1%)
1/2 tsp. ghee
For garnish
4-5 cashews
8-10 raisins
5-6 slivered almonds
1/2 tsp ghee
1 pod cardamom
Pressure cook the carrots whole until tender. In my pressure cooker this is 5 minutes with whistle on before turning off heat. For whistling cookers this would be one whistle. Let the pressure go down on its own before opening the cooker. Let the carrots cool.
Using a scraper or dull knife scrape away the skin of the carrots. It should come away very easily. Break the carrot open length wise and discard the uncooked center stalk. Mash the pulp lightly and keep aside.
In a pan heat ghee and add the carrots. Saute for a couple minutes and then add the milk. On low heat let the mixture thicken.
Meanwhile heat the ghee for garnishing in a separate pan and roast the cashews, almonds and raisins. Keep aside.
When the carrot mixture thickens turn off heat. Shell the cardamom and crush the seeds to a powder. Add this powder and the roasted nuts and raisins to the halwa.
Enjoy!
This is my entry for week three, day two of BM #43 for the theme Healthy Desserts. Check out the Blogging Marathon page for the other Blogging Marathoners doing BM#43.
Sunday, August 17, 2014
Chocolate Covered Banana Bites
Banana, chocolate and peanut butter - what more could your child want? Bite sized treats are always the most loved and these chocolate covered bananas filled with peanut butter are no exception.
My daughter has a sweet tooth and likes something small after a meal. She is not really fond of anything very sweet so this is a perfect treat for her. She can make it herself and it satisfies her need for something sweet.
I made these on a very hot day and even in my temperature controlled kitchen I had a hard time piping the peanut butter. I finally put the piping bag in the refrigerator for a few minutes along with the chocolate dipped bananas and that did the trick.
You will need
1 banana
1 handful of chocolate chips (I use Nestle semi sweet chips)
1 tbsp. milk
3 tbsp. peanut butter
Peel and cut the banana into 1-1 1/2 inch pieces. Using a spoon scoop out the center.
Place the chocolate chips in a bowl and melt them in the microwave. About 30-35 seconds stirring twice should do the trick. Add in the milk and stir the chocolate well. Swirl the banana pieces in the chocolate and place them upright on a plate. Refrigerate for an hour until the chocolate hardens. Put peanut butter in a piping bag with a wide nozzle. Pipe it into the hollowed banana letting it spill over the top. Refrigerate for about 10 minutes.
Enjoy!
My daughter has a sweet tooth and likes something small after a meal. She is not really fond of anything very sweet so this is a perfect treat for her. She can make it herself and it satisfies her need for something sweet.
I made these on a very hot day and even in my temperature controlled kitchen I had a hard time piping the peanut butter. I finally put the piping bag in the refrigerator for a few minutes along with the chocolate dipped bananas and that did the trick.
You will need
1 banana
1 handful of chocolate chips (I use Nestle semi sweet chips)
1 tbsp. milk
3 tbsp. peanut butter
Peel and cut the banana into 1-1 1/2 inch pieces. Using a spoon scoop out the center.
Place the chocolate chips in a bowl and melt them in the microwave. About 30-35 seconds stirring twice should do the trick. Add in the milk and stir the chocolate well. Swirl the banana pieces in the chocolate and place them upright on a plate. Refrigerate for an hour until the chocolate hardens. Put peanut butter in a piping bag with a wide nozzle. Pipe it into the hollowed banana letting it spill over the top. Refrigerate for about 10 minutes.
Enjoy!
This is my entry for week three, day one of BM #43 for the theme Healthy Desserts. Check out the Blogging Marathon page for the other Blogging Marathoners doing BM#43.
Tuesday, August 12, 2014
Blueberry Smoothie
A few days back I froze a few blueberries for another recipe and had a few leftover. Perfect for this smoothie! Just throw in the frozen berries with a few slices of banana and unflavored yogurt.
You will need
1 cup blueberries (fresh or frozen) (I used fresh berries that I froze for a day)
1/4 cup chopped banana (a little less than half)
1 cup unflavored yogurt
a pinch of cinnamon powder (optional)
5-6 ice cubes (use only if using unfrozen berries)
Mix everything together in a blender jar and blend until smooth.
Enjoy!
You will need
1 cup blueberries (fresh or frozen) (I used fresh berries that I froze for a day)
1/4 cup chopped banana (a little less than half)
1 cup unflavored yogurt
a pinch of cinnamon powder (optional)
5-6 ice cubes (use only if using unfrozen berries)
Mix everything together in a blender jar and blend until smooth.
Enjoy!
Monday, August 11, 2014
Cantaloupe Lime Smoothie
Cantaloupe and lime with a little bit of peach! The result is a refreshing and filling smoothie great for breakfast or to cool down on a hot summer afternoon.
I like to make this whenever I have a really sweet cantaloupe.
You will need
1 1/2 cups cantaloupe
1/2 peach
1 lime
handful ice cubes
Squeeze the juice from one lime in a blender jar. Add the cantaloupe, peach and ice cubes. Blend until smooth.
Enjoy!
Note:
Use the juice of a whole lemon especially if the cantaloupe is sweet.
The peach is needed to complete the flavor profile. Do not skip the peach.
I like to make this whenever I have a really sweet cantaloupe.
You will need
1 1/2 cups cantaloupe
1/2 peach
1 lime
handful ice cubes
Squeeze the juice from one lime in a blender jar. Add the cantaloupe, peach and ice cubes. Blend until smooth.
Enjoy!
Note:
Use the juice of a whole lemon especially if the cantaloupe is sweet.
The peach is needed to complete the flavor profile. Do not skip the peach.
Sunday, August 10, 2014
Narali Bhaat / Coconut Rice for Narali Pornima
Narali purnima or the full moon during the month of Shraavan. The day when coastal Maharashtra breaks a coconut at the beach to pray for a good post monsoon fishing season. The menu for the day includes the dessert Narali bhaat or coconut rice. Fresh coconut is combined with the local staple - rice, to make this delicious dish.
The menu includes, from the top clockwise, a bowl of tomato dal, potato bhaji, bharli wangi, poli, cucumber koshimbir and in the center narali bhaat.
The recipes for tomato dal and cucumber koshimbir will be updated in the next week.
For narali bhaat you will need
1 cup brown rice
1 cup shredded fresh or frozen coconut
1 scant cup jaggery or sugar
1 clove
1 tbsp. ghee or clarified butter
For garnish
1 tbsp. ghee
a few each of cashews, almonds sliver, raisins etc.
1 pod cardamom
Thaw the coconut if using frozen. Grate the jaggery. Soak the rice for half an hour. Drain and rinse.
Melt ghee in a pan and add the clove. When fragrant in about 1-2 minutes, add the rice with 2 cups of water. Bring it to a boil, lower heat, cover and cook. When the rice is almost cooked, about 20-35 minutes, add the coconut and jaggery. Mix carefully without breaking the rice grain. Let it cook another 5 minutes. During this time the jaggery will melt and coat the rice as it thickens.
Shell the cardamom and pound the seeds to a powder. Heat ghee in a separate pan and roast the cashews, almond slivers and raisins.
When the rice is done turn off heat. Sprinkle the cardamom and garnish ingredients.
Enjoy!
This is my entry for week 32 of the 2014 52 week challenge for the theme favorites.
The menu includes, from the top clockwise, a bowl of tomato dal, potato bhaji, bharli wangi, poli, cucumber koshimbir and in the center narali bhaat.
The recipes for tomato dal and cucumber koshimbir will be updated in the next week.
For narali bhaat you will need
1 cup brown rice
1 cup shredded fresh or frozen coconut
1 scant cup jaggery or sugar
1 clove
1 tbsp. ghee or clarified butter
For garnish
1 tbsp. ghee
a few each of cashews, almonds sliver, raisins etc.
1 pod cardamom
Thaw the coconut if using frozen. Grate the jaggery. Soak the rice for half an hour. Drain and rinse.
Melt ghee in a pan and add the clove. When fragrant in about 1-2 minutes, add the rice with 2 cups of water. Bring it to a boil, lower heat, cover and cook. When the rice is almost cooked, about 20-35 minutes, add the coconut and jaggery. Mix carefully without breaking the rice grain. Let it cook another 5 minutes. During this time the jaggery will melt and coat the rice as it thickens.
Shell the cardamom and pound the seeds to a powder. Heat ghee in a separate pan and roast the cashews, almond slivers and raisins.
When the rice is done turn off heat. Sprinkle the cardamom and garnish ingredients.
Enjoy!
This is my entry for week 32 of the 2014 52 week challenge for the theme favorites.
Double Strawberry Smoothie
If you like your smoothies sweet then this smoothie is not for you. But if you really like fruits and berries then you will love it. Three ingredients and ice is all it takes.
The first time I made this smoothie I decided to make just one cup for myself. I loved the rich creamy texture and the taste of berries. The next day I made it for my breakfast but asked my daughter to take a sip. Expecting a sweet smoothie she crinkled her nose at the mildly tart taste. Without thinking I starting my mommy lecture 'the first strawberry never tastes sweet. Your tongue needs time to adjust to the tart taste. By the third strawberry you start enjoying it.' She took two more sips and the next thing I know she put down an empty cup. It is that good. Try it.
You will need
1/4 cup cranberry juice
8 oz. strawberry yogurt (any brand)
a handful of strawberries (preferably fresh but frozen will do)
a handful of ice cubes (leave them out if using frozen strawberries)
Put everything in the blender and blend until smooth. If you have a problem with strawberry seeds run the smoothie through a sieve. No honestly, there is nothing you can do about the seeds other than use a different fruit.
Enjoy!
The first time I made this smoothie I decided to make just one cup for myself. I loved the rich creamy texture and the taste of berries. The next day I made it for my breakfast but asked my daughter to take a sip. Expecting a sweet smoothie she crinkled her nose at the mildly tart taste. Without thinking I starting my mommy lecture 'the first strawberry never tastes sweet. Your tongue needs time to adjust to the tart taste. By the third strawberry you start enjoying it.' She took two more sips and the next thing I know she put down an empty cup. It is that good. Try it.
You will need
1/4 cup cranberry juice
8 oz. strawberry yogurt (any brand)
a handful of strawberries (preferably fresh but frozen will do)
a handful of ice cubes (leave them out if using frozen strawberries)
Put everything in the blender and blend until smooth. If you have a problem with strawberry seeds run the smoothie through a sieve. No honestly, there is nothing you can do about the seeds other than use a different fruit.
Enjoy!
Thursday, August 7, 2014
Shewgyacha Shenga Amti / Drumstick Ambti
Drumstick or shewgyacha shenga are pods from the drumstick tree. The skin is not edible but the inner pulp and seeds are delicious. I saw fresh slender drumsticks in the Indian store a couple days ago and had to buy them.
My mother made this ambti. Ambti is dal to which a amsul or sol has been added. Ambti has a lovely tangy, sweet and spicy flavor. The drumstick enhances it.
You will need
1 1/2 cup dal
3 drumstick pods
1 tbsp. olive oil
1 tsp. mustard seeds
1/2 tsp. asafoetida
4-5 curry leaves
1 tsp. turmeric powder
3-4 amsul/sol
1 tbsp. goda masala
1 tsp. paprika
salt to taste
Wash and cut the drumstick pods to 3-4 inch pieces. Pressure cook the drumstick and dal (with 2 cups water) separately. Keep aside.
Heat oil in a pan and add the mustard seeds. When they crackle add the curry leaves and asafeotida followed by the turmeric powder. Add the cooked dal and bring it to a boil. Add the amsul or sol. Let the dal continue to simmer for about 3-5 minutes.
Add the goda masala and paprika. Add salt to taste. Let it simmer for another 2-3 minutes then add the drumsticks.
Bring it to a boil and turn off the heat.
Enjoy with rice or poli.
My mother made this ambti. Ambti is dal to which a amsul or sol has been added. Ambti has a lovely tangy, sweet and spicy flavor. The drumstick enhances it.
You will need
1 1/2 cup dal
3 drumstick pods
1 tbsp. olive oil
1 tsp. mustard seeds
1/2 tsp. asafoetida
4-5 curry leaves
1 tsp. turmeric powder
3-4 amsul/sol
1 tbsp. goda masala
1 tsp. paprika
salt to taste
Wash and cut the drumstick pods to 3-4 inch pieces. Pressure cook the drumstick and dal (with 2 cups water) separately. Keep aside.
Heat oil in a pan and add the mustard seeds. When they crackle add the curry leaves and asafeotida followed by the turmeric powder. Add the cooked dal and bring it to a boil. Add the amsul or sol. Let the dal continue to simmer for about 3-5 minutes.
Add the goda masala and paprika. Add salt to taste. Let it simmer for another 2-3 minutes then add the drumsticks.
Bring it to a boil and turn off the heat.
Enjoy with rice or poli.
Wednesday, August 6, 2014
Onion Rings
Onion rings are the classic side to burgers. They are crispy and usually deep fried. I made 'fried' these in the oven. They are crispy and crunchy without the oil bath.
These are approximate quantities as the level of heat and the amount of coating on the onions is a matter of personal taste
You will need
1/2 Yellow onion sliced in rings
1/4 cup all purpose flour
1/4 cup buttermilk
1/4 cup breadcrumbs (I made mine with day old homemade bread)
paprika to taste
salt to taste
olive oil
Preheat oven to 425 F. Prepare a baking sheet with parchment paper.
Start with the ingredients to dredge and bread the onion rings. Prepare three plates. In a bowl mix the flour with paprika and salt. Spread half the flour on the first plate and keep aside. To the remaining flour add the buttermilk and whisk until no lumps remain. Add the mixture to the second plate. You may choose to add an egg to the buttermilk if you like. In a separate bowl combine breadcrumbs with a little olive oil and salt. Mix well to get a crumby mixture and transfer to the third plate. You prep work is ready.
Pick up each onion ring and dredge through the flour. Coat with the buttermilk mixture and dredge in the breadcrumb mixture. Place it on the prepared baking sheet. Repeat for all the rings.
Bake in the preheated oven for 15-18 minutes or until brown. Flip over once half way through the baking process.
Enjoy!
This is my entry for week 31 of the 2014 52 week challenge for the theme breading/dredging.
These are approximate quantities as the level of heat and the amount of coating on the onions is a matter of personal taste
You will need
1/2 Yellow onion sliced in rings
1/4 cup all purpose flour
1/4 cup buttermilk
1/4 cup breadcrumbs (I made mine with day old homemade bread)
paprika to taste
salt to taste
olive oil
Preheat oven to 425 F. Prepare a baking sheet with parchment paper.
Start with the ingredients to dredge and bread the onion rings. Prepare three plates. In a bowl mix the flour with paprika and salt. Spread half the flour on the first plate and keep aside. To the remaining flour add the buttermilk and whisk until no lumps remain. Add the mixture to the second plate. You may choose to add an egg to the buttermilk if you like. In a separate bowl combine breadcrumbs with a little olive oil and salt. Mix well to get a crumby mixture and transfer to the third plate. You prep work is ready.
Pick up each onion ring and dredge through the flour. Coat with the buttermilk mixture and dredge in the breadcrumb mixture. Place it on the prepared baking sheet. Repeat for all the rings.
Bake in the preheated oven for 15-18 minutes or until brown. Flip over once half way through the baking process.
Enjoy!
This is my entry for week 31 of the 2014 52 week challenge for the theme breading/dredging.
Tuesday, August 5, 2014
Mumbai Masala Sandwich
Fresh sandwich bread stuffed with potato filling, tomato, onions, chutney and a special spice powder. These ingredients make up the Mumbai Masala sandwich.
I worked in Mumbai for a year but never summoned the courage to try these from the large number of roadside eateries. The best I could do was wada pav from a cart outside our residence and that was because my roommate bought it for me. Recently I ate this sandwich at a friend's house and finally understood why everyone loves it so. I had to try it at home.
I got my chance when I made this sandwich bread. My daughter loves potatoes and bread separately but did not care for the potato bread combination. My husband loved it even if he had never heard of the sandwich before. I really liked it and can see how it fits into the Mumbai street food scene.
You will need (for 4 servings as a meal)
A loaf of Sandwich bread
1 tomato, thinly sliced
1/2 onion, cut into rings
1 tbsp butter
For the potato filling
3 large potatoes
1 tbsp oil
1 tsp. cumin seeds
1 tsp. mustard seeds
1 onion, chopped
1 Serrano pepper (or other green chili pepper), minced
1 tsp. turmeric powder
1 inch ginger, shredded
1 tbsp. sandwich masala (recipe below)
1/3 cup frozen peas
4-5 sprigs cilantro
5-7 curry leaves
salt to taste
For the chutney see this recipe
For the spice blend powder
2 tbsp. cumin seeds
6-8 cloves
1 in cinnamon stick
1 tsp. black pepper corns
1 tsp. fennel seeds
1 tsp. black salt
1/2 tbsp. aamchur
Make the chutney and keep aside. To make the spice blend powder, roast all the spices, except black salt and aamchur, and grind to a fine powder. Mix in the black salt and aamchur. Cool completely and store in an airtight container.
Boil and peel the potatoes. Mash roughly and keep aside, do not knead. Chop the onion and green chili pepper. In a pan heat the oil and add the mustard seeds. When they crackle add the cumin seeds and curry leaves. Next add onion and Serrano pepper. Saute till tender then add the turmeric powder, sandwich masala, ginger and frozen peas.
Saute for a few minutes until peas are cooked.
Add the potatoes and salt to taste. Add a few tablespoons water to soften the mixture if needed. Turn off heat and allow it to cool.
To prepare the sandwich cut slices of bread and apply a layer of butter followed by chutney on one side of both slices. Spread potato filling over the top of one of the slices. Add a slice or two of tomatoes and onions. Sprinkle the sandwich masala liberally, adjust according to taste. Place the second slice chutney side down over the first.
Apply a little butter to the bottom of a sandwich toaster and place the sandwich inside. Add a dab of butter to the top.
Close the contraption and brown both sides. If you do not have one of these sandwich toasters then you can toast it on a pan.
Enjoy!
With this post I have reached a mini milestone. This is my 300th post.
I worked in Mumbai for a year but never summoned the courage to try these from the large number of roadside eateries. The best I could do was wada pav from a cart outside our residence and that was because my roommate bought it for me. Recently I ate this sandwich at a friend's house and finally understood why everyone loves it so. I had to try it at home.
I got my chance when I made this sandwich bread. My daughter loves potatoes and bread separately but did not care for the potato bread combination. My husband loved it even if he had never heard of the sandwich before. I really liked it and can see how it fits into the Mumbai street food scene.
You will need (for 4 servings as a meal)
A loaf of Sandwich bread
1 tomato, thinly sliced
1/2 onion, cut into rings
1 tbsp butter
For the potato filling
3 large potatoes
1 tbsp oil
1 tsp. cumin seeds
1 tsp. mustard seeds
1 onion, chopped
1 Serrano pepper (or other green chili pepper), minced
1 tsp. turmeric powder
1 inch ginger, shredded
1 tbsp. sandwich masala (recipe below)
1/3 cup frozen peas
4-5 sprigs cilantro
5-7 curry leaves
salt to taste
For the chutney see this recipe
For the spice blend powder
2 tbsp. cumin seeds
6-8 cloves
1 in cinnamon stick
1 tsp. black pepper corns
1 tsp. fennel seeds
1 tsp. black salt
1/2 tbsp. aamchur
Boil and peel the potatoes. Mash roughly and keep aside, do not knead. Chop the onion and green chili pepper. In a pan heat the oil and add the mustard seeds. When they crackle add the cumin seeds and curry leaves. Next add onion and Serrano pepper. Saute till tender then add the turmeric powder, sandwich masala, ginger and frozen peas.
Saute for a few minutes until peas are cooked.
Add the potatoes and salt to taste. Add a few tablespoons water to soften the mixture if needed. Turn off heat and allow it to cool.
To prepare the sandwich cut slices of bread and apply a layer of butter followed by chutney on one side of both slices. Spread potato filling over the top of one of the slices. Add a slice or two of tomatoes and onions. Sprinkle the sandwich masala liberally, adjust according to taste. Place the second slice chutney side down over the first.
Apply a little butter to the bottom of a sandwich toaster and place the sandwich inside. Add a dab of butter to the top.
Close the contraption and brown both sides. If you do not have one of these sandwich toasters then you can toast it on a pan.
Enjoy!
With this post I have reached a mini milestone. This is my 300th post.
Monday, August 4, 2014
Sandwich Milk Bread
This is the second bread suggested for this month for the new baking event 'tame the yeast'. This bread was recommended by Mirelle. It is a simple sandwich milk bread. It has a lovely flavor and the sandwiches tasted great and were filling.
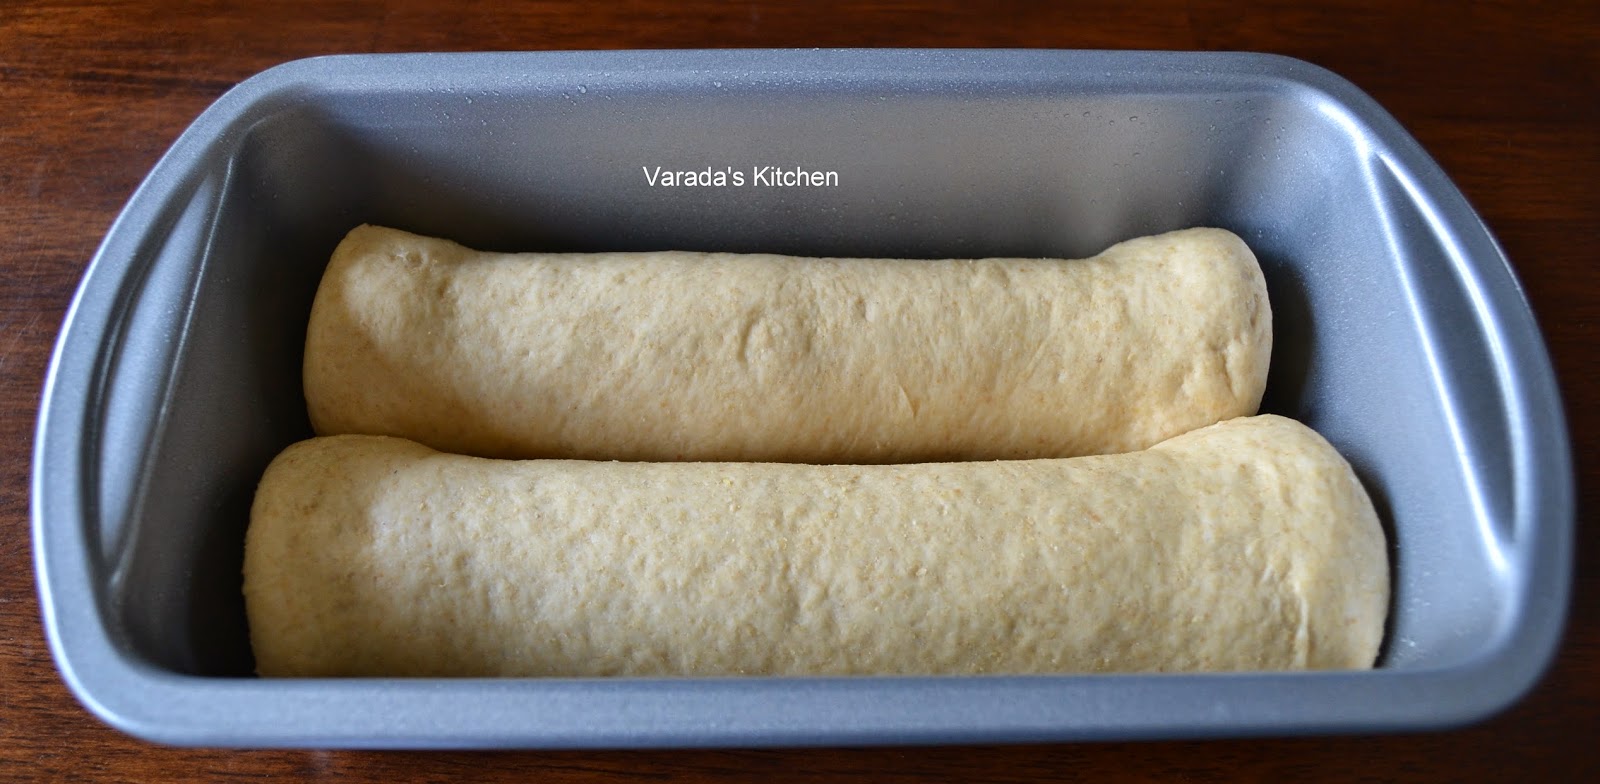
The bread has a unique shape as it is shaped by placing two rolls next to each other in the loaf pan. The bread baked to a beautiful golden brown without a wash. This is a great milk bread recipe that I will be baking again.
I switched all purpose flour for bread flour and used King Arthur white whole wheat flour. I had to add another 1/4 cup water than the original recipe called for to get a soft dough.
You will need
1 cup bread flour
1 3/4 cup white whole wheat flour
1/2 tsp. salt
1 1/2 tsp. instant dry yeast
1 tbsp. honey (I used sugar)
3/4 cup milk
1/4 cup water
1/4 cup butter
In a large mixing bowl sift the flours and add salt, yeast and sugar. In a bowl heat the milk, water and butter until the butter melts. Add the liquid to the flour and form into a soft dough. Knead until the dough is smooth and elastic.
Cover and keep aside until it doubles in volume, about an hour.
Grease a loaf pan and keep it ready. Transfer the dough to a floured surface and divide into two equal portions. Roll in a ball with a smooth top.
Roll one of the portion into a large rectangle. Start at the short side. Fold in the long sides such that the rectangle is the width of the loaf pan.
Roll in a tight roll and place on one side of the loaf pan. Repeat with the other portion and place it next to the first roll.
Cover and let it rise for another 30-40 minutes until it doubles in volume. In the last 15 minutes preheat the oven to 375 F.
Bake the loaf for 30-40 minutes until the top is golden brown and the loaf sounds hollow.
Cool on a cooling rack before cutting it into slices.
Enjoy!
The bread has a unique shape as it is shaped by placing two rolls next to each other in the loaf pan. The bread baked to a beautiful golden brown without a wash. This is a great milk bread recipe that I will be baking again.
I switched all purpose flour for bread flour and used King Arthur white whole wheat flour. I had to add another 1/4 cup water than the original recipe called for to get a soft dough.
You will need
1 cup bread flour
1 3/4 cup white whole wheat flour
1/2 tsp. salt
1 1/2 tsp. instant dry yeast
1 tbsp. honey (I used sugar)
3/4 cup milk
1/4 cup water
1/4 cup butter
In a large mixing bowl sift the flours and add salt, yeast and sugar. In a bowl heat the milk, water and butter until the butter melts. Add the liquid to the flour and form into a soft dough. Knead until the dough is smooth and elastic.
Cover and keep aside until it doubles in volume, about an hour.
Grease a loaf pan and keep it ready. Transfer the dough to a floured surface and divide into two equal portions. Roll in a ball with a smooth top.
Roll one of the portion into a large rectangle. Start at the short side. Fold in the long sides such that the rectangle is the width of the loaf pan.
Roll in a tight roll and place on one side of the loaf pan. Repeat with the other portion and place it next to the first roll.
Cover and let it rise for another 30-40 minutes until it doubles in volume. In the last 15 minutes preheat the oven to 375 F.
Bake the loaf for 30-40 minutes until the top is golden brown and the loaf sounds hollow.
Cool on a cooling rack before cutting it into slices.
Enjoy!
Subscribe to:
Posts (Atom)