Monday, May 11, 2015

Red Enchilada Sauce

Mexican cuisine is very loved in my house. Though the green sauce or verde sauce is preferred in my house I sometimes make this red enchilada sauce. It is very easy and has a surprise ingredient - cacao, that gives it a very distinct taste and color.


It is very easy to make and stores well for a couple days in the refrigerator. My daughter gives it two thumbs up.

You will need
4-5 ripe tomatoes
1/2 cup water
1 tbsp. basil
1 tbsp. oregano
1 Serrano pepper, diced fine
1 tsp. red chili pepper powder
1 tbsp. cacao shavings
salt and black pepper to taste

Dice the tomatoes and keep aside. Mix the spices except the cacao with the water. Bring to a boil.


Add the tomatoes and the chocolate. Cook until the tomatoes are softened. Add salt and pepper. Turn off the heat and let it cool. Run the mixture through a blender until smooth. Use in your recipe as needed.


Enjoy!

Tuesday, May 5, 2015

Semolina Porridge

My mother used to make the best porridge. She did not make it often but I loved it every time she made it. Back then I did not know if it was easy or difficult to make the porridge. All I knew was that I loved the sweet creamy goodness.


Today I made this porridge for breakfast for my daughter. Like my mother I do not make it often. I prefer oatmeal. But just like me my daughter enjoys a warm cup of porridge. I like a moderately thick porridge. Adjust the ratio of semolina to milk based on whether you like the porridge runny or thick.

You will need (2 servings)
2 cups milk
1/2 cup semolina
2 tbsp. sugar (adjust to taste)

Warm the milk and keep aside. Roast the semolina in a pan over medium heat. When there is a very slight change in color add the sugar and the warm milk. Bring it to a boil and turn off the heat.


Enjoy!


Sending this to the Kid's Delight event hosted this month by Mireille who blogs at Chef Mireille's East West Realm.


This is my entry for week one, day three of BM #52 for the theme Creamy Foods. Check out the Blogging Marathon page for the other Blogging Marathoners doing BM#52.

Monday, May 4, 2015

Sabudanyachi Lapsi / Sago Kheer

Food is such a basic need and we eat so many different types of foods through out our life. There is food we grew up eating, food we cook in our own homes as adults, food we have tasted in a restaurant, food that entices us with a look at a picture, food we taste on our travels, and so on. And then there is that small collection of recipes that does more than nourish our body, it wraps us in this cocoon of comfort and takes us back to a safe happy place. Today I will present one such recipe.


This is the recipe my mother used to make when I recovered from an illness and had no taste for food. Sabudana lapsi would bring a smile to my face and I would do my best to finish the bowl. The recipe is nothing special but it is comfort food. I rarely make it but today I was thinking of all the recipes I used to love as a child and wondered how many of those I have made for my daughter. And I remembered this. So I made a small bowl full.

You will need
1/4 cup sabudana/sago
1 cup milk
1-2 tbsp. sugar (adjust to taste)

Wash and soak the sabudana in very little water for a couple of hours. Take 2-3 tablespoon of water in a pan and add the soaked sabudana to it. Heat the water and when it is almost gone add the the milk and sugar. Bring it to a boil and let it simmer for a few minutes. Turn off the heat. You can eat it either hot or cold.


Enjoy!


Sending this to the Kid's Delight event hosted this month by Mireille who blogs at Chef Mireille's East West Realm.


This is my entry for week one, day two of BM #52 for the theme Creamy Foods. Check out the Blogging Marathon page for the other Blogging Marathoners doing BM#52.

Sunday, May 3, 2015

Pineapple Mousse

With summer right around the corner all the cold comfort foods are making their way back into the menu. It was when I was planning ahead for the week that I realized I did not have a recipe for mousse in this space. The light and airy foamy dessert is perfect for a hot summer day.


I had some crushed pineapple in the refrigerator so I decided to puree it and made pineapple mousse. I used agar agar to thicken it and heavy whipping cream as the base. Since the pineapple was not sweetened I used a little sugar. The end result for so light and creamy! I liked the mildly sweet taste. My daughter on the other hand said she would have preferred chocolate mousse.

You will need
3 cups crushed pineapple in juice or cubed pineapple
3/4 cup cream (I used heavy whipping cream)
2 tbsp. sugar (adjust to taste)
1/2 cup water
2 tsp. agar agar

Puree the pineapple chunks and keep aside. Heat the water and add agar agar. Stir to dissolve and turn off heat. In a separate bowl whip the cream and sugar until fluffy. It should visible double in size. Add the fruit puree and agar agar. Blend together. Do not allow the aerated cream to deflate. Transfer to single serving bowls and refrigerate for 3-4 hours.


Enjoy!


Sending this to the Kid's Delight event hosted this month by Mireille who blogs at Chef Mireille's East West Realm.


This is my entry for week one, day one of BM #52 for the theme Creamy Foods. Check out the Blogging Marathon page for the other Blogging Marathoners doing BM#52.

Saturday, May 2, 2015

Fire up the oven - An assortment of baked dishes

I love to bake. I love baking bread, dinner casseroles, desserts and traditional recipes. Though I like to bake cakes and cookies my real passion is trying out Old World recipes using my natural levain also sometimes called a sourdough starter. During the month of April a group of blogger friends got together for a baking event we called Fire up the Oven. As part of this event I showcased baked recipes using a different theme each week.

The first week I had recipes that were fun to bake. The second week was sourdough breads. The third week was baked hor d'oeuvres. The last week I posted one dish from each course ending the week and the month with a dessert. Here is a recap of everything I baked.


Everything is better and more fun with friends and this was no exception. It was nice to chat and plan with friends. Showing off your special pictures and admiring the pictures shared by friends ahead of time made the whole journey enjoyable.

Thursday, April 30, 2015

Ganache filled Whoopie-pie

Whoopie pie is a cream filling sandwiched between two cake like cookies. By cake like I mean they taste more like cake even though they are shaped like cookies. This is the last day of my month long baking challenge. I have posted a baked recipe this month every day except Sundays. Most of those recipes used either whole wheat flour or vegetables. I strongly believe in the concept of everything in moderation so this is my last recipe for the month made with all purpose flour and butter.


My daughter is fond of chocolate but not milk chocolate. She prefers bitter or bittersweet high percent cacao. So I thought a chocolate ganache made with 75% cacao would make the perfect filling for these pies. I was right. She loved them. And uncharacteristically had two in one sitting.


For some reason I did not take step-by-step pictures. All I have is the end result.

Recipe source for the cookies is here
You will need (for 12 pies)
For the cookies
2 cups all purpose flour
1 cup sugar
1/2 cup cocoa powder
1 tsp. baking soda
1 tsp. salt
1/4 tsp. vanilla extract
1 large egg or equivalent egg substitute
4 tbsp. butter, softened
2 tbsp. oil

For the ganache
2 oz 75% cacao
2 tsp. dark chocolate powder
1/2 cup heavy whipping cream
a pinch salt

To make the ganache, bring the cream to a boil and turn off heat. Add the chocolate and the salt and let it sit for a few minutes. Stir to smooth out the mixture and let it cool and thicken.


Meanwhile make the cookies. Preheat oven to 350 F. Sift the flour and combine with all the ingredients until smooth. The dough will be soft. Drop a tablespoon of cookie dough on a parchment paper covered baking sheet. Continue to place the cookie two inches apart. I got 12 cookies to a sheet. And I got two sheets. Bake both together in preheated oven for about 7 minutes. Switch the trays and bake another 5-7 minutes or until the cookies are cooked through. Cool on a cooling rack.

Apply a tablespoon of ganache on the flat side of one cookie and place another cookie over the top. Repeat for all the cookies.


Enjoy!


Wednesday, April 29, 2015

Bird Shaped Dinner Rolls

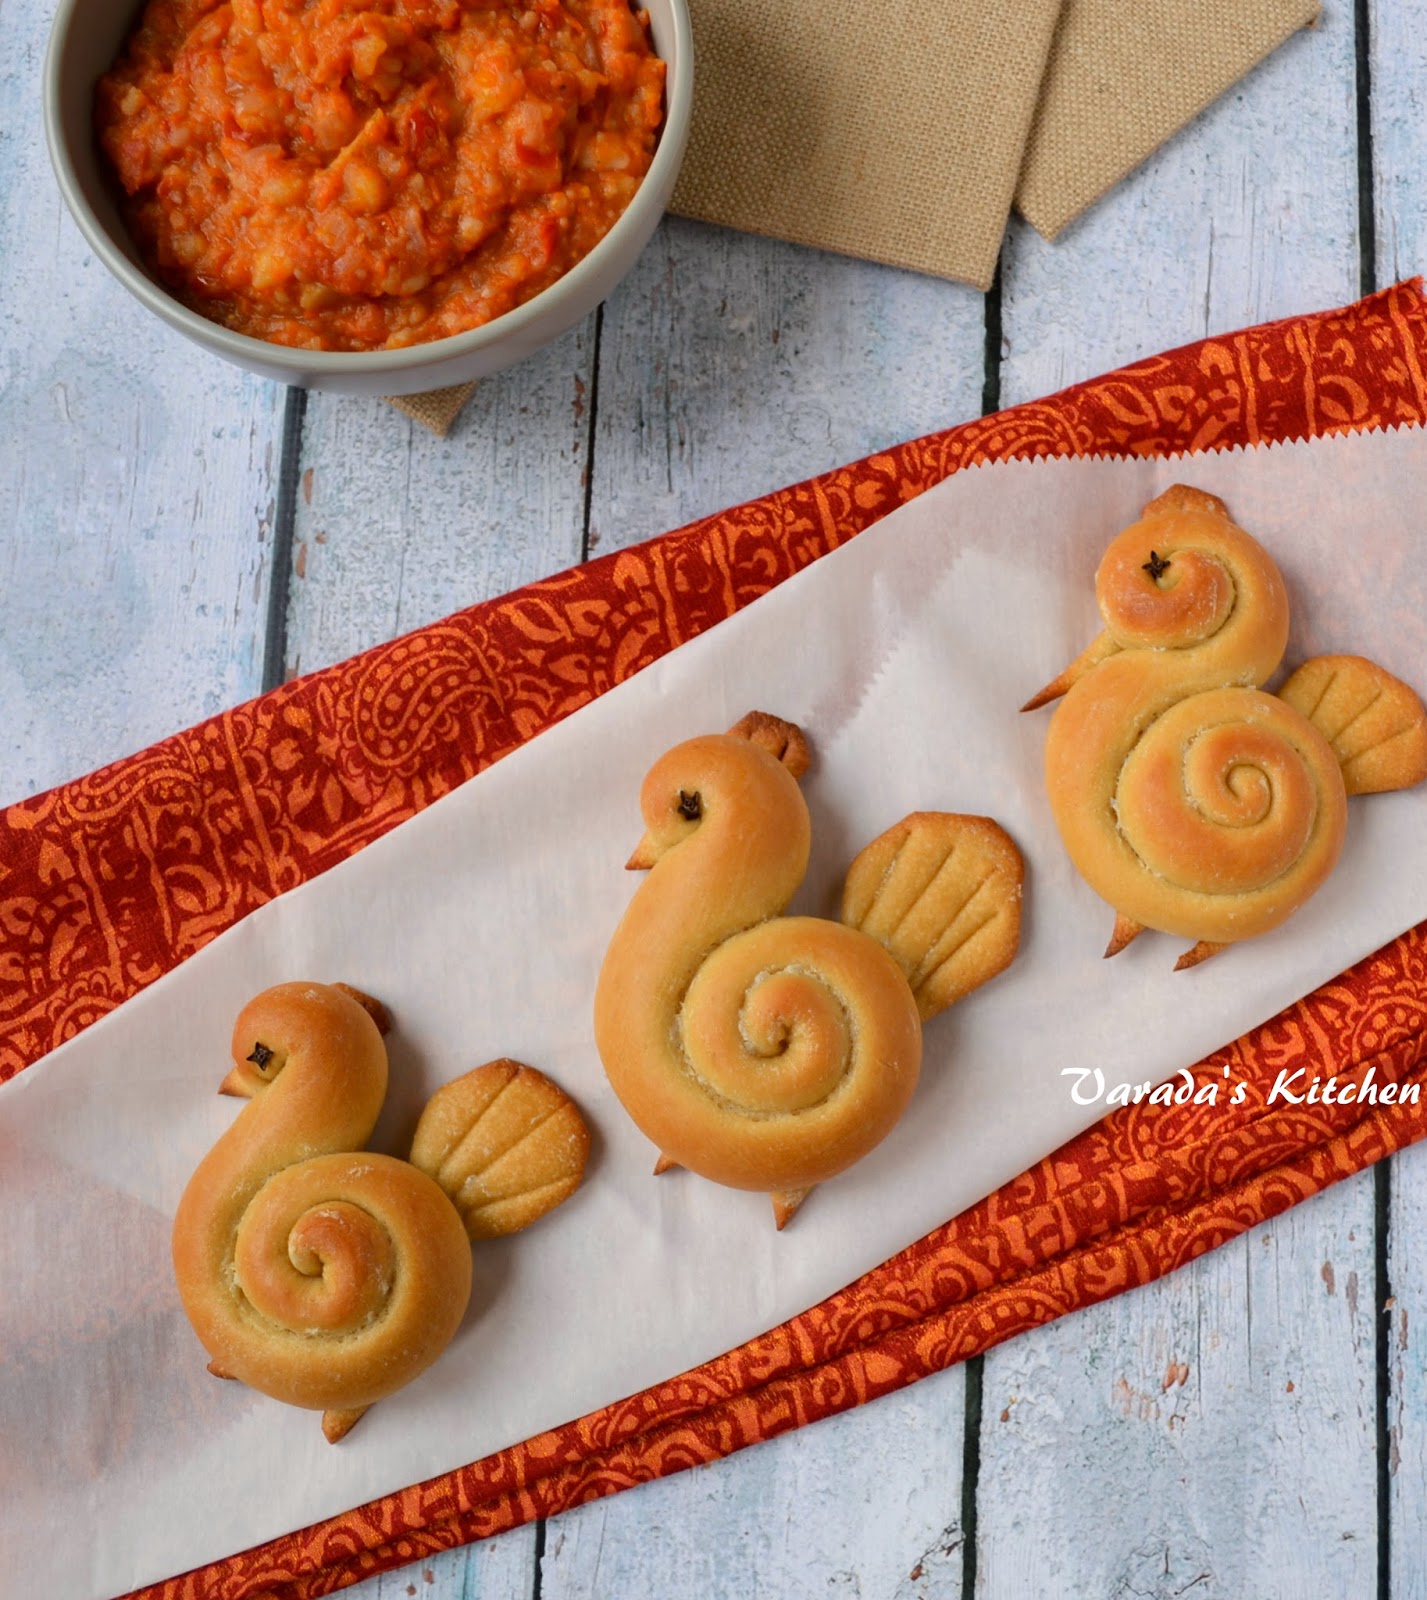
One of the weekend staples in my house is pav bhaji. Pav bhaji is a vegetable side served with dinner rolls. Bread hot out of the oven is always appetizing and paired with a mixed vegetable side allows me to clean out the refrigerator in preparation for a new week. I usually make one of the many rolls recipes I have on this blog. But sometimes I like to try something different. Today I shaped the rolls to look like birds.


There was no difference in taste but they are fun to shape and fun to eat. I had seen a picture of these birds on Pinterest a while back. They was no recipe or blog associated with it. It was just a picture. I saved it for a later day. Using the dinner roll recipe for these birds turned out to be a great decision. They were eaten for lunch and tasted great.


My daughter was very reluctant to eat the birds. She said they were too pretty to eat. My husband and I had no such problems.

You will need (8 birds)
1 egg or egg substitute of your choice
1/2 cup + 2 tbsp. milk
3/4 cup water
1 tsp. instant yeast
2 tbsp. sugar
1/4 cup olive oil
1 tsp. salt
1 cup all purpose flour
3 cups whole wheat flour (I used chapati flour, you can use any whole wheat flour)
8 cloves for eyes
1 tbsp. heavy cream as wash (you could use milk instead of cream)

Beat the egg in a large bowl. Heat the milk and water together until lukewarm and combine the solution with the egg. Add the yeast, sugar, oil and salt. Sift in the flour and knead into a soft dough. Continue kneading until the dough is smooth and elastic, about 5-7 minutes. Cover and keep aside until it doubles in volume.

Divide the dough into 8 equal and 2 smaller portions. The 2 smaller portions will be used to make the feathers, beaks and legs. Take one of the larger portions. Roll it out as a long rectangle using a rolling pin. Now fold it along the long side and make a think rope. Keep rolling the rope to make it longer and a little thinner. Start from one end fold the edge of the rope and continue rolling it inward. Repeat from the other side. You should get something like this.


Keep aside on a baking sheet covered with parchment paper. Repeat for the other large portions. Ensure the shaped bird is covered with a damp towel to prevent it from drying. Using the smaller portions shape the legs, beak and wings. Use the picture below as a guide. Place the cut shapes under the main body.


Let the shaped birds rest for 15-20 minutes. Meanwhile preheat the oven to 375 F. Just before placing the birds in the oven wash with the cream or milk.


Bake for 20-25 minutes or until they begin to change color and are cooked through. The same recipe in the shape of a roll takes a little longer to bake. When shaped like a bird using ropes the bread cooks faster.


Transfer to a cooling rack and serve with butter/cheese or as I did with a mixed vegetable side.


Enjoy!


Monday, April 27, 2015

Herbed Feta Focaccia

Focaccia made a great afternoon snack. My daughter loved it. So here is my version with herbed oil and feta cheese.


I had planned on taking pictures of the crumb but she thought it would be cool to tear instead of cut the bread. I let her have her way. It was only after it was all gone that I realized I have just one picture of this recipe. If you need help with detailed instructions you can refer to an earlier version of focaccia I have on this space.

You will need
1 1/2 tsp. sugar
1/4 cup olive oil
3 1/2 cups whole wheat flour
1 tsp. instant yeast
1 tsp. salt
1 1/2 cup warm water

For topping
2 tbsp. olive oil
1/4 tsp. basil
1/4 tsp. organo
1/4 tsp. thyme
2 tbsp. feta cheese

Combine the topping except the cheese and allow the oil to soak up the flavor of the herbs.

Combine all the ingredients for the dough in a mixing bowl and form a soft dough. Knead for a few minutes, cover and keep aside. Allow it to double in volume, about 1-2 hours.

Preheat oven to 375 F. Divide the dough in two portions. I used half the recipe so I had just one portion. Roll out the dough to a 1/2 inch thickness. Using your fingertips dimple the rolled out dough. Brush the herbed oil and leave the dough aside for 15-20 minutes. Brush again with the remaining oil. Bake for 15-20 minutes. The top should be a light brown color. Remove from the oven and sprinkle on the feta cheese. Bake for another 5 minutes.


Enjoy!

Saturday, April 25, 2015

Roasted Strawberry Bruschetta

This entire week I have posted different types of hors d'oeuvres. My final post in this series is a roasted fruit appetizer. Originally I wanted to use fruit as the base but none of the fruit that lend themselves to baking is available in the market. It is too early in the season. I will post my planned recipe in summer when the ingredients are available but for this week here is my fruit based appetizer.


Strawberries are generally cooked over the stove top. However, they taste really good when they are roasted in an oven. As they are baked strawberries retain their shape. Leave them alone as they cool and they turn juicy and flavorful. The resulting strawberry in its juice goes great with ice cream or as topping on pie. But it also tastes great as a topping for bruschetta. I used my baguette recipe as the base. You can find that here.


I have made savory bruschetta with tomatoes, basil and mozzarella before. This is a very different recipe but the flavors go together just as nicely as the regular bruschetta. Everyone at home loved it.

You will need
1 baguette, sliced into 1/2 inch rounds
10 strawberries, sliced into 1/2 inch slices
2 tsp. balsamic vinegar or 1 tbsp. sugar
1/4 cup goat cheese
1 tbsp. olive oil

Bake the baguette using this recipe. You could you a store bought baguette. Preheat the oven to 350 F. Slice the strawberries and combine them with either the vinegar or the sugar. Spread them in a single layer on a parchment paper covered baking sheet. Bake for 5-10 minutes. Keep aside to rest.


Brush oil on the baguette slices. Place the slices on a baking sheet and broil for 1-2 minutes on each side. You want them to be crisp and toasty.


Apply a layer of goat cheese to the slices. The rested strawberry should be very juicy by this time. Cut up the strawberries into smaller pieces and combine with the juice in a bowl. Place a few pieces of the strawberry and juice on each of the bread slices.


Enjoy!

Friday, April 24, 2015

Mini Stuffed Puffs

This was a very experimental recipe. I had never made this before but will be making it again. I am posting bite sized appetizers this week. I wanted to make a bite sized stuffed fruit puff. But at the last minute I realized I had some left over vegetable filling I used in another recipe. So I decided to use that filling instead. The flaky homemade pastry and the vegetable stuffing made this hors d'oeuvre a very wholesome bite.


I made this recipe on Prom night. My daughter left late afternoon and was gone for the rest of the day. I made these for our dinner. My husband for some reason chose not to eat it so it was my dinner. I like it a lot but would have to say they are best eaten hot out of the oven.

You will need (for 4 mini puffs)
For the puff shell
50 gm bread flour
1 tbsp. melted butter
1/2 tsp. instant yeast
1/2 tsp. salt
15 gm water

For the filling
1/4 roasted red bell pepper, dice finely
1/4 roasted yellow bell pepper, dice finely
1 roasted carrot, diced finely
3 tbsp. goat cheese
4-5 leaves basil chiffonade
1/4 tsp. cayenne pepper powder
salt and pepper to taste

Combine the melted butter with the flour. Add in the other ingredients and combine to form a very soft dough. Knead for 5 minutes. Cover and keep aside for an hour or two.

Preheat oven to 375 F. Divide the risen dough into four portion. Form one of the portions into a ball and flatten with your palm. Place it on a baking sheet covered with parchment paper. Repeat for the other portions. Let the prepared puffs rest for 15 minutes. Bake for 15-20 minutes or until the pastry looks done and starts to change color. Take it out of the oven and let it cool a little. 

Meanwhile combine all the ingredients for the filling and keep aside until needed. Using a paring knife score a circle on the top layer of the pastry. Carefully cut into the top layer and scoop out the cut circle.


Stuff some of the filling into the puff. 


Replace the lid. Repeat for the other puffs. Put them back into the oven for another 5-10 minutes. Serve hot out of the oven.


Enjoy!

Thursday, April 23, 2015

Cheesy Cherry Tomatoes with Rye Berry

I had once seen an cooking show on TV where they stuffed tomatoes with millet. I am not sure what else was used or if the tomatoes were baked but the idea for the filling staying with me. When I finally decided to try a bite sized recipe with tomatoes I started searching for a suitable filling. I had rye berries in the pantry so I used them. Since then I have used rye berries and millet successfully in this recipe. I used shredded smoked gouda and a little asiago cheese with lots of basil. The rye provides some substance to an otherwise soft fruit. We enjoy the smoky flavor of cheese. If you do not like it you can use regular gouda or even cheddar.


I made this version when my daughter was out on a sleepover with friends. I cooked a special dinner for the two of us and this was our appetizer. My daughter loves tomatoes so we saved some for her. She finished them all but they did not taste as good as the day they were baked. These should be served straight out of the oven.

You will need
20 large cherry tomatoes
1/4 cup rye berries
2 tbsp. shredded smoked gouda
2 tbsp. shredded asiago
5-10 leaves basil chiffonade
salt and pepper to taste

Soak the rye berries overnight or at least 4 hours. Soaking the berries not only makes them easier to cook but most importantly makes them more bioavailable. The body is able to absorb the nutrients better. Make sure you discard the water the berries were soaked in. Place the soaked berries with 1/2 a cup of water and salt. Cook on medium heat for about 20 minutes or until the water is all gone and the berries are cooked. Keep aside.

Preheat the oven 375 F. Cut the tomatoes along the length and scoop out the seeds. Place them on a kitchen towel and let the water drain out. Now place the almost dry tomatoes on a baking sheet covered with parchment paper.


In a separate bowl combine the berries with the other ingredients. Stuff the tomatoes with this mixture.


Bake in the preheated oven for 10-12 minutes. The tomatoes should begin to just begin to crinkle. If you let them bake anymore the tomatoes will fall apart. Take it out of the oven and serve hot.


Enjoy!


Wednesday, April 22, 2015

Roasted Zucchini Bites

Zucchini is one of those vegetables that can reduce to mush when the recipes demands it but can stand up on retain its shape if called upon to do so. It is so versatile and can be used in sweet and savory dishes. A while back I had made zucchini boats a recipe that never made it to the blog. This recipe is a bite size variation of that creation.


Roasted vegetables in all forms are a favorite in my house. Roasted zucchini base topped with roasted bell peppers and goat cheese makes a perfect hors d'oeuvre. I like some char on the vegetables to enhance the taste. A little basil adds to the flavor.

You will need
4 zucchini (slender)
1/4 red bell pepper, dice finely
1/4 yellow bell pepper, dice finely
1 carrot, diced finely
3 tbsp. goat cheese
4-5 leaves basil chiffonade
1/4 tsp. cayenne pepper powder
salt and pepper to taste

Preheat oven to 400 F. Wash and clean the zucchini. Cut off the ends. Slice the zucchini in thick rounds. Place them on a baking sheet covered with parchment paper.

In a bowl mix the remaining ingredients. Carefully place a teaspoon of mixture on top of the sliced zucchini. Repeat for the remaining slices. Bake for 15-20 minutes or until the vegetables are cooked through but still hold their shape. Serve hot.


Enjoy!


Tuesday, April 21, 2015

Mini Brie en Croute

Brie en Croute is a popular appetizer served with either crackers or fruit. A slab of brie is baked inside pastry dough sometimes with fruit. The melted brie in the pastry shell is then served on a heated platter. This a mini version of the popular appetizer. The little balls of pastry have a filling made of a chunk of brie along with some apricot preserve. The pastry is baked with the filling inside. When served hot but not piping hot, it makes a great appetizer. The brie is molten and the fruit preserve adds a mild sweet flavor. The outer shell remains crunchy but is not hard.


I brought fresh French made Brie from Whole Foods just for this recipe. Imported Brie can be expensive but Whole Foods will willingly cut you a sliver the size you want. I got just enough for this recipe and to use as a snack with fresh sourdough bread. I made my own pastry dough. I have my own shortcut method for when I want a soft but not necessarily very flaky dough. It is called go easy on the butter.


Brie is a soft cheese that melts completely when heated. It is covered with a rind made of mold that I usually throw away. However, for this recipe it is better to keep the rind on the bottom to give it some added support and keep the cheese from oozing out of the pastry shell.

You will need (for 4 mini en croute)
For the pastry shell
50 gm bread flour
1 tbsp. melted butter
1/2 tsp. instant yeast
1/2 tsp. salt
15 gm water

For the filling
4 1/2in by 1 in cubes of brie
2 tsp. of apricot preserve

Whipping cream for brushing the top

In a mixing bowl combine the the butter, flour, salt and yeast. Rub the butter into the flour until it is soft. Add the water and combine to forma  really soft dough. Knead until the dough is smooth and elastic. Cover and keep aside for an hour or two.

Preheat the oven to 425 F. Divide the dough into four portions. Roll out the portions to small thick disc.


Place a chunk of brie with a 1/2 tsp of fruit preserve over the top.


Fold the pastry shell around the brie and seal it closed. Repeat for the other portions. Keep aside for 15 minutes.


Bake on a baking sheet covered in parchment paper for 15-20 minutes. Lower the heat to 375 F. Remove the baking sheet and working quickly brush the top with whipping cream. Return the baking sheet to the oven. Bake for another 15-20 minutes or until the top begins to brown. Place on a cooling rack for a few minutes before serving.


Enjoy!