Saturday, October 17, 2015

Onion Paratha / Pyaz Paratha

I accidentally bought too many onions and needed to use them up. Onion is not part of our everyday cuisine so unless I need onions for something special they do not get much use. It occurred to me that parathas are made with almost every vegetables so onion paratha may be a real possibility.


I did not know where to begin so I searched Vaishali's space and found this recipe for onion paratha. I mostly followed her recipe except I used white onion. These onions are sweet unlike its red counterpart. My daughter called them interesting which when translated means "Could you please not make them again. I will eat them without complaint this time." I personally think they tasted great and all the mix ins were very flavorful but they would taste a lot better with red onions instead of the white ones.


You will need
2 cups whole wheat flour (chapati flour)
1 tsp. oil
1/2 large onion
1 bunch cilantro leaves
5-6 int leaves
1 tsp. red pepper powder
salt to taste

To brush the top
1 tbsp. oil

Take the wheat flour in a mixing bowl and using water as needed form a soft dough. Keep aside covered.


Dice the onion and put it in a bowl with teaspoon of salt. Let it sweat for 10 minutes. Squeeze out the water and let the onion dry out. Mix it with chopped cilantro and red pepper powder.


Divide the dough into lemon size portions. Take one of the portions and flatten it on the palm of your hand. Place a tablespoon of onion mixture in the center and close the disc over it to form a ball of dough. Roll it out into a disc and dry roast it on both sides on a hot griddle. Take it off heat and brush a little oil over the top. Repeat for the remaining portions of dough.


You could enjoy the parathas with pickle. Or you can do what my daughter does. Eat it on its own.


Monday, October 12, 2015

Red Potatoes Side / Bhaji

Grocery shopping is one of my chores every weekend. I like to plan my menu and get a week's worth of supplies. I find it hard to spare time to shop for groceries during the work week. Sometimes I miscalculate and at the end of the week I am left staring at an empty vegetable drawer. I try to compensate by soaking dry peas/beans but sometimes I forget. On one such Friday I realized that the only vegetables I had were potatoes and an onion. I had plenty of dried herbs so this was the result.


These potatoes are usually eaten for breakfast but I cooked them for lunch. They tasted great with poli.

You will need
4 small red potatoes, peeled and cut into cubes
1/4 small red onion, finely diced
1 tbsp. olive oil
1 tsp. basil
1 tsp. parsley
1 tsp. ginger
salt and pepper to taste

Heat the oil in a saute pan. Add the red onion and saute for a few minutes. Add the potatoes and let them brown. Add the remaining ingredients and saute for a few more minutes.


Enjoy!


Sunday, October 11, 2015

Roasted Vegetables Take Two

Roasted vegetables and steamed vegetables are popular side dishes on buffet tables. They go well with a variety of main dishes and taste great by themselves. I have a roasted vegetable recipe here that I use to stuff sliders. For this recipe I wanted something that could be served on its own. I cut the vegetables into large pieces and roasted them until they were cooked but not mushy. They hold their shape well and seasoning with salt, pepper and a little oil.


There is really no recipe for these vegetables. I used zucchini, red bell pepper and onion. You could add other vegetables of your choice. Cut the bell pepper and onions in thick strips. Cut the zucchini in thick circles along the length. Add salt, pepper and drizzle a little oil.


Bake in a preheated oven at 400 F for 20-25 minutes. Turn the vegetables upside down and bake again for 15-20 minutes.


The vegetables should be cooked through but not turn mushy and limp. Take them out of the oven and serve them while hot.


Enjoy!


Saturday, October 10, 2015

Brunede Kartofler (Caramelized Potatoes)

I first made these caramelized potatoes last September. The flavors in this dish were very new to me. Sweet caramelized potatoes take getting used to. My daughter who loves potatoes finished everything. She has asked for it several times since I first made it.


This is a very simple dish made with bite sized tiny potatoes. I got a bag of these potatoes from Whole Foods.

Recipe source here
You will need
20 tiny potatoes, any color
3 tbsp. sugar
2 tbsp. butter

Boil the potatoes in salted water. Drain, peel and keep aside. Heat a pan and add the sugar. Watch closely to avoid burning the sugar. As soon as the sugar melts add the butter. The butter will bubble up so be careful. Add the potatoes. Mix well and serve warm.


Sunday, October 4, 2015

Microwave Rice Pudding

As you probably read in my post yesterday my daughter is visiting for the weekend. She will return to college today afternoon. I keep asking her what she wants to eat as the dorm food is not great. The first time she visited she was full of demands. She missed the home cooked food so much! This time around she has gotten used to dorm life, a good thing, so does not have much on her wish list. There was some rice left over after dinner and she loved the idea of pudding for breakfast. So this morning I made her some creamy rice pudding and she enjoyed it very much.


I do not buy white rice so any left over rice in the house is brown/wild/mixed etc. I made the rice pudding with leftover brown rice and she enjoyed it very much. Rice pudding is generally baked or made over the stove top. This is my microwave version. It helps if you know the power level in your microwave where the milk simmers but never comes to a boil. In my microwave it is P20. If you do not know the power level you can reduce the power to P50 and watch the bowl like a hawk to keep the milk from overflowing. Reduce or increase the power as needed until you can let it go for 2 minutes at a time without have to stir or have the milk overflow.


The proportions are approximate. If you like the pudding runny use more milk, if you like it thick and creamy use less. I made it thick and creamy the way my daughter likes it.

You will need
3/4 cup cooked rice
1 pinch nutmeg powder
1 tbsp. cane sugar, you can use brown or granulated (adjust as needed)
1-1/2 cup milk (adjust as needed)
10-12 raisins
1 pinch cardamom powder

In a microwave safe mug or bowl add the cooked rice, nutmeg and sugar. Add just enough milk to cover the rice completely. Place in the microwave and on reduced power cook for 2 minutes. Stir and cook again for 2 minutes. The reduced power should keep the milk simmering but not let it overflow. Continue to cook in 2 minute intervals until the milk thickens and the rice starts blending in. It took me about 16 minutes. Take the bowl out of the microwave and let it sit on the kitchen counter. Mix in the raisins and the cardamom powder.


Enjoy!


This is my entry for week one, day two of BM #57 for the theme mug treats. Check out the Blogging Marathon page for the other Blogging Marathoners doing BM#57.

Friday, July 24, 2015

Chocolate Chip Buttermilk Pancakes

Last week my daughter suddenly had the urge to eat pancakes. She wanted to run to the store to buy a bag of chocolate chips so she could add it to the pancakes. She looked to me for help to make the batter. I asked her to try it herself. She used this recipe for guidance and made the most flavorful pancakes I had ever eaten.


When she was in Kindergarten PowerPuff Girls was a very popular cartoon on TV. The three girls saving their town in every episode were her favorites. Our cats are named after them. These pancakes reminded us of one of the episodes. We googled it and found it was the 2nd episode of season 2. It is available on You tube. The episode starts with a regular family where the Mom cooks pancakes everyday. Everyday she asks her family to guess what they are having for breakfast and everyday she serves pancakes.


The original recipe called for 1 3/4 cup milk so my daughter added a cup of milk. She then realized the pancakes would taste better with buttermilk so she add 3/4 cup buttermilk. She meant to add 2 drops of vanilla but the bottle tilted too much and a whole tablespoon fell in. She is my daughter after all, cannot follow a recipe. :) But the pancakes came out fluffy and flavorful. And we enjoyed them.

You will need
2 cups all purpose flour
1 tbsp. sugar
1/2 tbsp. baking powder
1/2 tsp salt
1 egg
1 cup milk
3/4 cup buttermilk
2 tbsp. butter or oil
2 drops vanilla extract

1/4 cup chocolate chips

Milk all the dry ingredients in a bowl. Whisk the egg and mix in the other wet ingredients. Combine the dry and wet ingredients.

Heat a pan and drop a 1/4 of a cup of batter on it. Sprinkle some chocolate chips. When done flip it over and cook the other side. Remove from heat. Repeat for the remaining pancakes.


Serve hot with pure maple syrup. Enjoy!

Saturday, July 11, 2015

Black Bean Cucumber and Avocado Salad

Salads make a great meal and so easy to make. I am adding this to my new section of dorm room recipes. The dressing on this salad consists of black pepper, salt, lime juice and cayenne pepper powder. Do not skip the cayenne, it enhances the flavor of the salad. The salad calls for cucumber and spinach or any green of your choice. It would be something you would whip up after a trip to the grocery store. Or if you have access to fresh vegetables in your cafeteria salad bar.


Some schools allow unlimited access to the cafeteria. They also allow you to carry your meals out of the cafeteria. If you are at one of those schools this salad is for you.  Grab a bunch of spinach and cucumber and head to your room. If you have avocado the salad will taste even better, if you don't skip it. Unfortunately, you cannot stock up on avocado but you can stock up on limes and black beans.


This salad is perfect for days you want something fresh but filling. This quantity serves two people. You could either have it as dinner with your roommate or make it for lunch and dinner on a busy day.

You will need
1 can black beans
a bunch spinach leaves, chopped
1 cucumber, diced
1 avocado, seed removed and diced (optional)

For the dressing
juice of 1/2 lime
1 tsp. cayenne pepper powder
salt and pepper to taste

Open the can of beans, rinse and drain the liquid. Keep aside. In a bowl add all the ingredients including those for the dressing. Toss to mix it up. Leave aside for 5 minutes.


Enjoy!

Friday, June 26, 2015

Apple Banana Smoothie

Fruit smoothies are great in summer. I usually make smoothies with fresh fruit, ice and soymilk. But this smoothie is a little different. It is made with a frozen banana. I had three overripe bananas that I put in the freezer to use up later. One of them went into this smoothie. I had it for breakfast.


Demand for smoothies is unpredictable in my house. It is not something I prep for without asking unless I am going to drink it. My daughter loves smoothies but she has to be in a mood to have one. I, on the other hand, can have a smoothie anytime.

You will need
1 apple, peeled, cored and cut up in chunks
1 frozen banana
1/2 cup orange juice 
1/4 cup soymilk

Blend all the ingredients in a blender until smooth.


Enjoy!

Thursday, June 25, 2015

Blueberry Yogurt

Fruit with yogurt is very popular in summer and flies off the shelves. You can make this fruit flavored yogurt at home. All you need is your favorite yogurt and some fruit. I used fresh blueberry. You can use any fresh berry or stone fruit. My daughter is not very fond of the store bought versions but she loves this homemade version. The sauce can be made ahead and you can have a bowl every day of the week.


The recipe is really simple.

You will need
1 cup yogurt
3 tbsp. blueberry sauce

Layer the two as desired. If you like it all mixed in whisk the two together.


Enjoy!


This is my entry for week four, day two of BM #53 for the theme Fruits in any form. Check out the Blogging Marathon page for the other Blogging Marathoners doing BM#53.

Friday, June 19, 2015

Banana Split

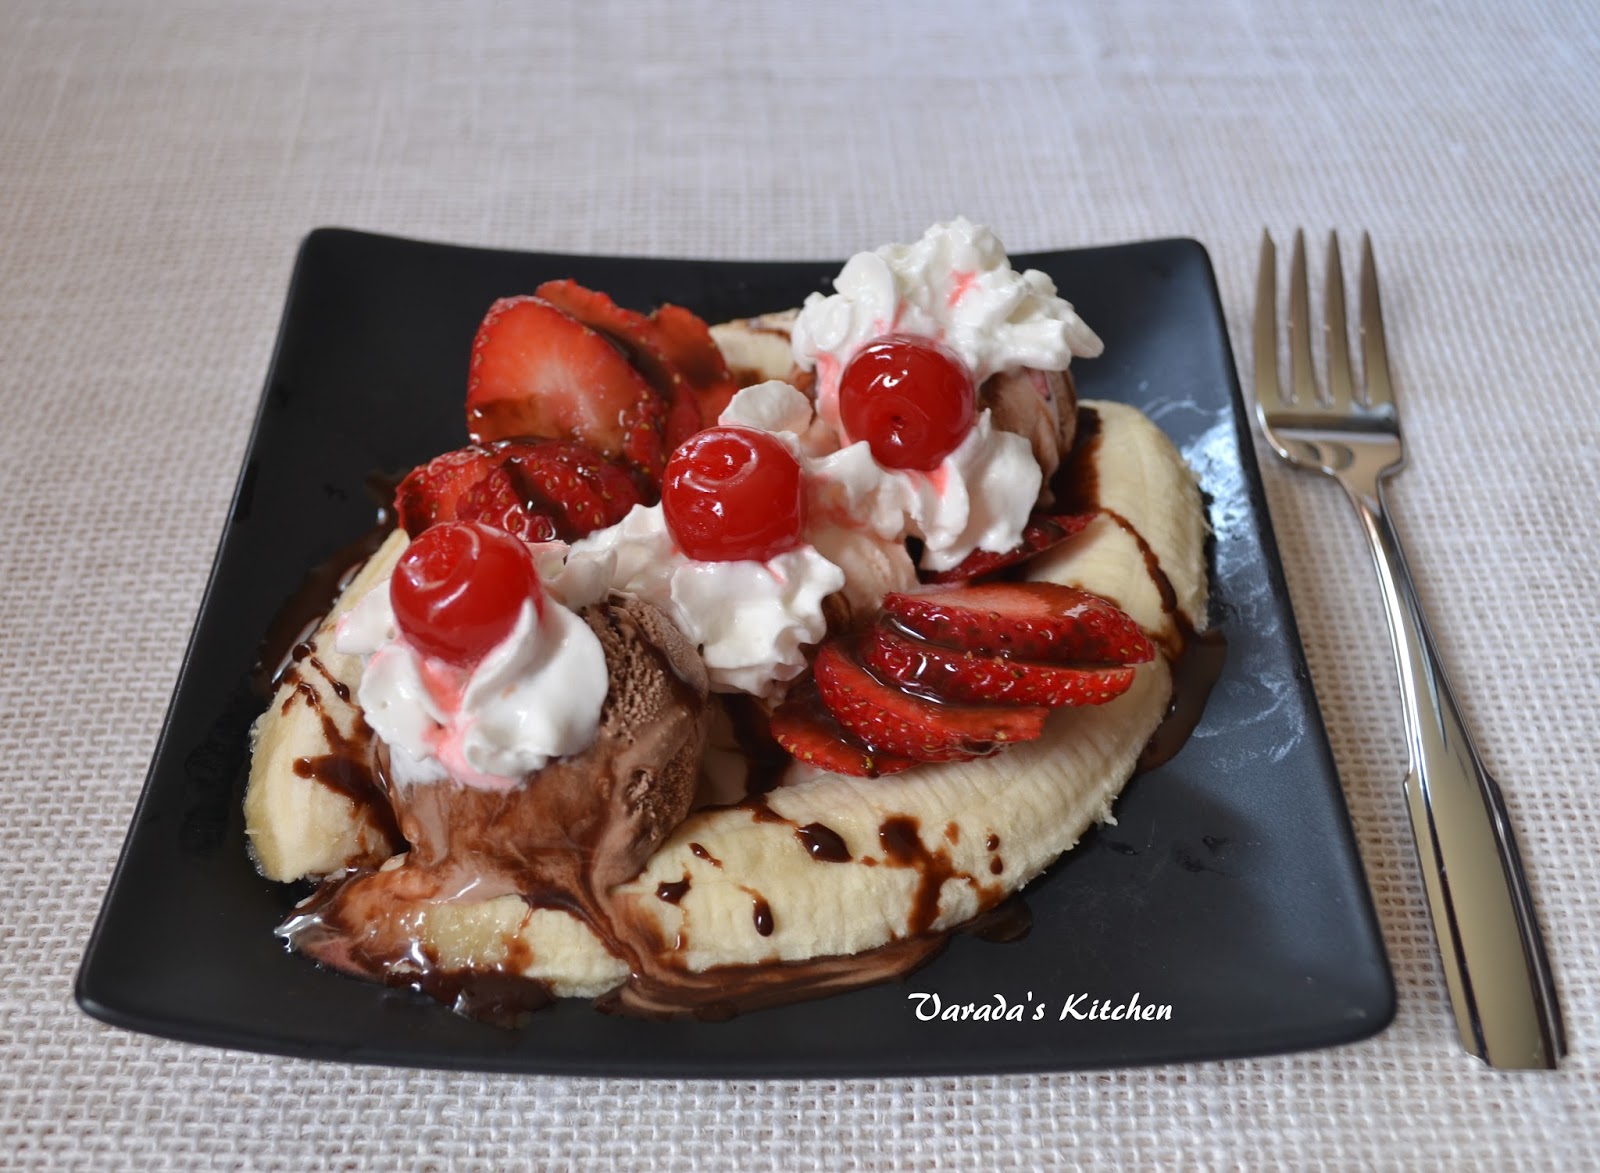
A long time ago when there were fewer responsibilities, when there was no homework to worry about and before there were early bedtimes to adhere to, going out every evening after dinner was the norm. My husband and I would go out with friends, to the mall or sometimes we stopped for some ice cream. At the ice cream shop we would order a banana split and share it. Banana split always brings a smile to my face as all those memories come flooding back.


Recently my daughter told me she had never tasted a banana split. While I am pretty sure she has I realized I had not made it for such a long time that she did not remember it. So I made some. I used the traditional chocolate, strawberry and vanilla flavored ice cream, chocolate sauce and some fresh strawberries. My daughter loved it.


This dessert is really filling so you might want to use small scoops to control portion size. Or split the dish between two people.

You will need (for 1 banana split)
1 just ripe banana
1 scoop chocolate ice cream
1 scoop vanilla ice cream
1 scoop strawberry ice cream
2 tbsp. whipped cream (adjust to taste)
2 tbsp. chocolate sauce
3 maraschino cherries

You may choose to buy whipping cream and make your own whipped cream. You can also make chocolate sauce at home or get store bought.

To assemble prepare the plate. You can use a special elongated dish or use a flat plate like I did. First peel and cut the banana along its length. Place it on the plate such that there is just enough room in between the two pieces to place the scoops of ice cream. Place the scoop of vanilla ice cream in the center and the chocolate and strawberry ice cream on either side. Add the chocolate sauce and the whipped cream. You can add nuts or fresh fruit. Place the cherries on top of each scoop of ice cream. Serve immediately.


Enjoy!

This is my entry for week three, day two of BM #53 for the theme Ice cream all the way. Check out the Blogging Marathon page for the other Blogging Marathoners doing BM#53.

Thursday, June 18, 2015

Falooda

Falooda is one of those desserts that I loved the first time I tried it. However, for years I lived in a relatively small town where not only could you not find a creamery or ice cream shop that sold falooda but you could not even find a store that sold the ingredients. It was such a pleasant surprise to find grocery stores with all the ingredients when we moved to Texas. And then we found a creamery that sold some great tasting falooda.


For some reason my daughter does not like this dessert. My husband and I do not go out just for dessert and so we have not been to the creamery in a long time. Last week I ended up with a lot of ice cream in my freezer and this is one way I decided to use it. 

You will need
1 tsp rose syrup
1 tsp. basil or sabja seeds
2 tbsp falooda noodles
1 cup milk
1 tbsp condensed milk
2 small scoops vanilla ice cream
crushed nuts to garnish

Soak the basil seeds in a 1/2 cup of water for about 15-20 minutes. Soak the falooda noodles in water until soft. In a tall glass add the rose syrup. Drain the basil seeds and add them to the glass. Drain the noodles and add them over the top. Add the milk and condensed milk. Scoop in the ice cream. Gently stir the mixture but do not allow the layers to mix completely. Garnish with nuts and serve.


Enjoy!


Wednesday, June 17, 2015

Chocolate Sundae

Summer is right around the corner and the mercury is shooting up. Schools are out and the kids are enjoying their new found down time. The afternoons are so hot, everyone is looking for something to cool down with. Ice cream fits the bill perfectly. It is even better if the ice cream is decorated with chocolate sauce and whipped cream. That brings me to this sundae. It is easy to put together. You can make your own chocolate sauce like I did or use store bought sauce. You can whip up the whipped cream or buy it at the store. A few crushed nuts on the top add a nice crunch.


The other day I asked my husband to get a small tub of ice cream to make some ice cream soda. He bought two large tubs. He had a pretty good reason for buying so much ice cream but I cannot remember what it was. You cannot return ice cream so I had to use up the two tubs. As a treat my family got to eat some new and old favorites with ice cream. Watch this space for more.

You will need
2 scoops vanilla ice cream
1 tbsp. or more chocolate sauce
whipped cream as needed or whip heavy whipping cream
chopped peanuts
maraschino cherry (optional)

To assemble: If using heavy whipping cream whip it until light and fluffy just before using it. Scoop the ice cream in a bowl. Add the whipped cream. Pour chocolate sauce. Garnish with nuts and a cherry.


Enjoy!


This is my entry for week three, day one of BM #53 for the theme Ice cream all the way. Check out the Blogging Marathon page for the other Blogging Marathoners doing BM#53.

Friday, June 12, 2015

Tortilla Roll Diploma

This is the season for graduation, high school and college children finishing one phase of their life and moving on.  This is also the season for graduation ceremonies and parties with friends and families. My daughter graduated from high school this year and this is one of the dishes I made for her the week she graduated.


Time flies and it seems only yesterday I dropped her off at her first day of Kindergarten. She was looking forward to it so much, she could not wait to run into the classroom. When the teacher asked the children to line up, wave to the parents and walk into the classroom, she waved and never looked back. And now she is all done with school and is ready for college.


I used whole wheat tortillas from Whole Foods. I also used canned black beans and store bought salsa making this a semi homemade meal. I have not specified quantities as you can adjust them to your taste.

You will need
whole wheat tortilla as needed
cooked black beans as needed
tomatoes, diced
lettuce shredded
sour cream
salsa

Heat the tortilla in a hot pan. Flip over to heat both sides. Spread some sour cream on the tortilla. Place the black beans, tomatoes, lettuce and salsa over the tortilla. Roll it up and serve warm.


To make these for a graduation party cut a length of ribbon and tie it around the roll to make it look like a diploma.


Enjoy!